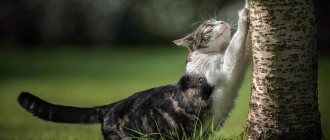
Cats are probably the most popular pets in all countries. In Russia alone there are about 34 million of them in apartments. These affectionate purrs not only brighten up our loneliness, but also become true friends. And, of course, a caring owner always tries to provide them with favorable living conditions. One of the main vital needs of a cat is sharpening its claws. In this way they update their claws and put special marks. Sharpening claws is instinctive: even animals that lack them continue to try to do it anyway. Naturally, our furniture, carpets and even wallpaper suffer from them. To avoid this, be sure to get a scratching post and teach your cat to use it. The stores are full of both expensive and cheap options. And in this article we will tell you how to make a scratching post for cats with your own hands.
DIY scratching post for cats
What is a scratching post for?
The simplest reason is that pets have long had to get their own food.
No less interesting is the hypothesis about the relationship between cat health and the claw scratching procedure. There is an opinion that here we are talking about a kind of exercise for the whole body. The surface on which the cat rests acts as a training device. All muscles and bones of the skeleton take part in the process.
The next reason also concerns health. Towards the end of the paws, pads and claws there are many nerve endings and blood vessels.
By scratching, the cat massages sensitive areas, improves its tone and even gets nased. Often, a cat, stretching on a scratching post, purrs contentedly, how such training delivers.
It is believed that with the help of a nail polisher, animals renew their claws and thus prevent the possible development of inflammatory processes in the paw pads.
What is it for?
The fact is that animals’ claws grow, just like people’s nails, throughout their lives. Lovely ladies who take care of their nails cannot understand the procedures of pets who “file off” their claws on hard surfaces.
If you don’t have a nail polisher, use anything that will allow you to carry out a “manicure” procedure - furniture upholstery, carpets, furniture legs, children’s toys, outerwear, shoes.
What should a scratching post be like?
The main requirement for a place to sharpen cat claws is strength. — The surface of the claw blade should be fibrous and rough. The fibers must break, otherwise the pet will hang on the sharpener, becoming entangled in it.
And lastly, the material must remove static electricity: furry pets with their furstekikikikikikik
If you combine all these requirements, you will understand that they are fully met by natural materials: wood, hemp, burlap, coarse woolen fabric, thick cardboard.
Important! Devices for sharpening claws should not contain metal nails, screws or claws omnepemmetemob, inmateb
You can get by with a simple board, but if you really care about your cat, it is better to equip the structure with a bed on a hill.
The furry owner will be able to survey her possessions, the highest support as razodimtikamotikamotikamotikamotikam
Important. Cats never leave marks where their den is, this is an instinct of self-preservation.
If your pet is large enough, then the sharpener should match its size. When creating a product, you first need to focus on the dimensions of the cat. Especially when you are making a wall model, otherwise the animal may scratch the wall.
The length of the scratching post should be 5-10 centimeters of the length of the animal itself (the tail, in this case, is very long). The width of the product is oriented towards the width of the outstretched paws.
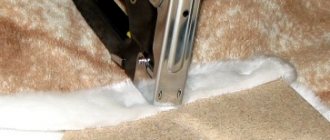
Option 5: floor scratching post
For a particularly active cat, you can make a scratching post on the floor. You don’t have to worry that your pet will turn something over or ruin it. What do you need:
- leg-split;
- main board;
- several wooden blocks;
- stapler, screwdriver.
Wooden beams act as sidewalls; they are attached on both sides to the base. Next, the entire structure is wrapped with twine. To keep everything in place, they are additionally fixed with furniture staples.
What types of scratching posts are there for cats?
One of the simplest options is a special rug. It can be cut from an old carpet and sent to a seamstress for finishing the edges using an overlocker. The advantage is that it can be linked anywhere. Depending on the activity of the animal, the mat may not last long.
A more reliable option is a wall-mounted scratching post. This could be the same rug suspended on a nail or a more reliable rigid structure. By the way, you can use it to cover the “traces of the crime” on the wall.
Since cats are so partial to corners in the apartment, a corner scratching post will suit them. As follows from the photo, this attribute can be turned into a room decoration.
This scratching post is conveniently attached to the table legs. Structurally, this can be a mat wrapped around the leg and secured with Velcro, a coated pipe placed over the support brackets, or a thick cord wound directly around the leg.
A scratching post with a shelf will, of course, provide more “service” to your pet. Of course, making it a little more difficult than previous options.
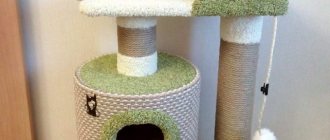
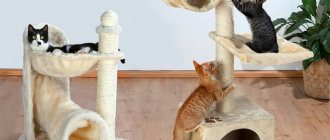
This solid “exercise machine” on the floor clearly pleased the mustachioed robber. You can place the craft anywhere, and the cord must be replaced as it wears out. There are designs in the form of a column, as well as those combined with a bed and a house. Of course, they give cats more options and are quite popular.
The most complete option is a scratching post combined with a place for games and relaxation in the form of a special make-up. As follows from the photo, a lot of space will have to be allocated for its installation, and assembly will be required. Are you purchasing or planning to purchase something similar?
A simple DIY scratching post made of cardboard
The cardboard scratching post should be horizontal. The cat stands on it with all four paws, although traditionally it pays more attention to the dvedum pere. Sometimes they make combined versions in two planes - both under the feet and a small column.
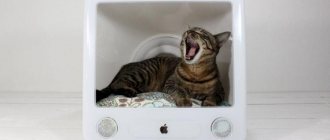
You can make a scratching post from corrugated cardboard with your own hands; all that remains is to purchase large household appliances (refrigerator, stove) or electronics (TVs).
The easiest way to quickly make a scratching post for a kitten is as follows:
- Cut the corrugated cardboard into equal strips 5-6 cm wide.
- After drying, you can approximately cover the sides with the remaining cardboard.
Important! A roller made of thick fabric, wrapping paper twisted into a tight drum - the cat will scratch its claw. But the lifespan of such homemade structures is very short, they literally transform before our eyes.
Corner design
Can be installed on both external and internal corners. Corner scratching posts, like wall-mounted ones, unlike floor-mounted ones, require durable fasteners. The distance from the floor should be chosen based on
You can also install the corner structure on furniture. An aesthetically executed scratch will not greatly spoil the appearance of a sofa or chair, but it will protect against the claws of an animal if it gets into the habit of sharpening its claws in this particular place.
Universal scratching post
The scratching post is often used by cat lovers due to its versatility. A cat can sharpen its claws on both horizontal and vertical surfaces, climb up, and chase a toy attached to a post. If you fix a horizontal platform on top of the post, then the issue with the bed will be more resolved.
Sometimes cats tear up furniture legs, most often table legs. Here you can improvise - wrap it with twine and you will get a ready-made claw blade.
To make a scratching post, any available material is suitable - a board or plywood for support, a small block or a piece of plastic pipe for a post. Having screwed the beam to the base using self-tapping screws or fastening metal corners, you need to tightly wrap the beam with twine or sisal rope using a glue gun fastening.
We wind the rope tightly onto the post scratching post Advantages of sisal rope: high strength, durability, natural material
The base can be painted, sealed with a piece of dense fabric, carpet, or laid and sealed with a piece of dense fabric. The main requirement for such a structure is stability.
Floor scratching post
This model is convenient because it does not take up much space in the apartment, it can be rearranged and customized. The most uncomplicated version of a floor scratching post is an ordinary board covered with carpet. You can also wrap a thick twine around the base.
When making such a nail polisher, the main condition is the weight and stability of the device so that it does not drag on the floor when the cat decides to sharpen its claws.
To do this, it should be no narrower than 20 cm and no shorter than 50 cm. A step on one side will not allow it to swing on the upholstery elements. In this case, this is a piece of the same board up to 10 cm in size. It is convenient to fasten wooden parts with self-tapping screws. In my opinion, the step should not be fixed to the end of the board, but placed under it. In this case, we will not break the product if we accidentally step on it.
You can cover the craft with carpet and secure it with staples. You can also wrap it with a thick cord. To secure the ends of the twine, wrap it with electrical tape and secure it to the wood with a self-tapping screw. Twine over a large area can be fixed with PVA glue or hot glue from polomogetev.
Wall-mounted scratching post options
Instinct tells the cat that its claws can be sharpened on wood. So don't be surprised if your purr stands up on his hind legs and wants to ruin the wallpaper. Help him and yourself too...
On the reverse side you need to provide a hanger, which should be glued to the plywood. In this case, the product, fixed at one point, will swing on the wall and can ruin everything
The same sheet of plywood can be coated with white acrylic paint, treated with cord or carpet, as described above, and securely fastened to the wall and below. In this case, the heads of the screws must be closed so that the cat does not get injured by getting caught in the clip.
It’s even better to wrap the cord on a board measuring about 15x60 cm, fasten it to two transverse planks measuring about 15x60 cm, fasten it to two transverse strips - This circumstance will also protect the wall from erroneous movements of the cat.
Wall-mounted scratching post for upholstered furniture
This model is especially for a cat who does not want to change his favorite sofa for anything else.
You will need 3 wooden boards. One is for wrapping with sisal rope, the second is slightly wider in size than the sofa armrest, the third will hang from the inside of the sofa as a retainer. In general terms, the design resembles the letter G and is hung on the side back of the sofa.
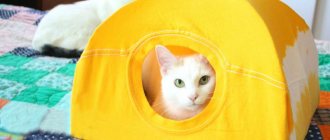
Scratching post house
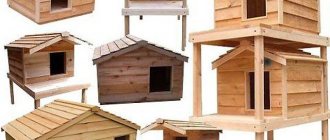
You can make a cat scratching post with a house with your own hands using one of the following methods:
- Develop two separate elements (house and stand), and then connect them together.
- Another simpler method is to design the cat scratching post and the house together as a single whole.
The second option has an advantage.
It’s easy to make a house with a scratching post for a cat:
- The walls are cut out according to the intended dimensions.
- To make the structure harmonious, the interior space can be divided into two floors - pinamnekotekotekotekotekimek
- It is necessary to provide at least two exits in different directions - one of them is recommended.
- All structural elements are connected with metal corners or using wooden slats.
- The roof must be removable - later cleaning and disinfection are carried out through it.
- The inner walls must be covered with any thick fabric, and the outer walls must be covered with material suitable for scratching posts (for example, carpet trimmings).
Important.
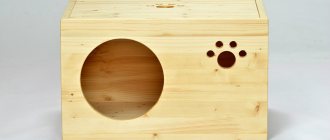
Scratching post niche
This structure can become a home and place for your pet to play. If you have several boards lying around in the garage or utility room, you can use them to assemble a small booth. To make the building look beautiful, each wall can also be wrapped in sisal. What do you need:
- rope;
- hammer;
- some nails;
- furniture stapler.
Scratching post in the form of a pillow
A claw pad is the simplest and cheapest option. The surface is finished with felt, and the product itself is mounted on the wall. The disadvantage of such scratching posts is that playful cats are unlikely to find this device interesting and playful.
Road version of scratching post
Mini versions of scratching posts are perfect for traveling. Most often, owners take flat devices with them, because they do not take up much space. Small cone-shaped models are also suitable.
Original scratching post
“They will make an original product and give it any look and purpose that you desire.
These could be scratching posts in the shape of a winding tree with hammocks for cats; devices that serve as both a claw holder and a floor vase; You can make a scratching post-cabinet, inside of which you can store any items.
Vase-claw
Such an item can perform two functions at once: to distract the cat’s attention from the flowers ich slukoget vektekotekoget vectov ich slugavekoget Dried flowers can be stored inside, as they do not need water. Even if the cat knocks over the vase, there will be no problems.
You can use a plastic or glass vase as a base. Then it is simply wrapped with sisal rope. For stability, it can be glued to the surface of the floor structure.
The size of the scratching post for cats depends on the age of the pet. A vase that is too large may scare the kitten away.
Option 6: two-story claw house
A scratching post with a cat house is ideal for the whole family of cats, especially if kittens have recently appeared. All their attention will be concentrated in the play area, where they can also relax. Step-by-step instructions are provided below.
Materials
To increase interest, you can additionally introduce a small branch. Walking through the forest, you can always find dry driftwood, which, after varnishing, will become an ideal addition to the interior. What else:
- plywood - 2 sheets;
- sisal - the amount depends on the size of the entire structure;
- textile;
- saw;
- screwdriver
All this is usually in the garage or utility room, so a luxurious cat house will turn out to be very budget-friendly, but beautiful.
Drawing
You can find a detailed diagram of a scratching post for cats on the Internet. Owners often post finished masterpieces on social networks. Based on them, you can create your own project on a simple A4 sheet. If there are several cats, it is advisable to make the house larger. Be sure to allocate a place in the apartment where pets feel protected.
Note!
- Do-it-yourself illuminated mirror - step-by-step master class on how to make it yourself, photos of types of lighting
DIY flower stand - TOP 100 photos of stand options, detailed instructions, diagrams and drawings from the masters
Do-it-yourself furniture restoration: restoration methods, step-by-step master class, necessary tools and materials
Important! The branches can serve as scratching posts and beams on which houses will be supported. In this case, they are not varnished, but wrapped with twine.
DIY scratching post: photo ideas for beautiful options
Step-by-step instructions with photos for making scratching posts with your own hands
Making a claw cutter is a simple and fascinating task. It's like a toy for your kitten, he should like it. The success of the entire enterprise depends on his reaction.
Cardboard scratching post: the simplest
Let's start with a simple and budget option - a cardboard sharpener. It can be done if a small kitten has just appeared in your house. Moreover, you can complete the production of the product in literally half an hour.
Step 1. Take regular cardboard packaging boxes with wide and fairly thick corrugation (look at the end of the box wall and you will understand what we are talking about). Take them apart. Preparing cardboard boxes
Step 2: Using a ruler and marker, mark each box 12cm wide.
Stripes 12 cm wide are drawn
Step 3. Using the same ruler and utility knife, cut the cardboard into strips according to the previously drawn ones. Cut the cardboard on a solid base that you don't mind damaging, or use scissors. Cardboard is cut into strips
Step 4. Start twisting individual pieces of cardboard into a tube, turn by turn.
The pieces are rolled into a tube
Step 5. To prevent the cardboard from unwinding, secure the strips with tape or glue. Individual lanes need to be fixed
Step 6. When you get the “bobbin” of the desired size, you can stop winding. You will get a large cardboard scratching post that your cat will definitely appreciate. DIY cardboard scratching post for cats
DIY carpet scratching post
Step 1. First of all, prepare the base. This can be a piece of board or several bars connected to each other, as in the photo. We recommend taking a solid board - it’s easier and faster. It will take several bars
Step 2. The bars are connected with self-tapping screws
3. After this, take thin foam rubber, attach a piece of wood to it and measure out a piece of foam rubber the same width as the future scratching post. Cut it off.
You need to measure a piece of foam rubber
Step 4. Next, take a small rug or a piece of old carpet, the remnants of the carpet after repair.
Step 5. Place a piece of wood on the underside of the rug first, then a piece of foam rubber. Foam rubber is laid on top of the wooden blank
Step 6. Simply roll the foam board into the mat, being careful to roll it very tightly.
Step 7. Secure the mat with self-tapping screws in several places so that it does not unfold. It is important to take short self-tapping screws so that their ends do not come out through the wood.
The scratching post is created and ready to be fixed on the wall. Additionally, you can add several laces to its upper part, which will attract attention.
Scratching post made from plumbing pipe and rope
In this master class you will see how quickly and easily you can make a post-claw claw.
1. The socket is cut from the pipe
Step 2. The length of the pipe blank should be 70 cm. If the pipe is too long, cut it off.
The pipe must be 70 cm long
Step 3. Take 4 ordinary furniture corners and, attaching them to the pipe, make marks on it in accordance with the fastening holes on the corners. Drill holes with a suitable drill bit. Holes are drilled in the pipe
Step 4. Attach the furniture corners to the pipe using bolts and nuts. Be sure to tighten them well to keep the connections strong. Furniture corners attached
Step 5. Take a sheet of plywood or chipboard and cut a piece measuring 50x55 cm from it. Cut chipboard sheet
Step 6. Turn the plywood piece over and mark the middle. The center of the workpiece is marked
Step 7. Place the pipe so that the center of its holes and the center of the plywood sheet coincide. Mark the places that coincide with the holes in the furniture corners. Marking holes in furniture corners
Step 8: Drill holes in the plywood using a drill and then screw the base to the pipe. The pipe will be held in a vertical position thanks to the corners that securely hold it. The pipe is screwed to the base
Step 9. Now take a piece of carpet and mark the middle. The piece should be approximately 60x65 cm in size. The middle of the piece of carpet is marked
Step 10. Next, cut a round hole in the middle of the same diameter as the pipe. It is most convenient to cut with a stationery knife.
The hole is cut with a stationery knife
Step 11. Pass the pipe through the hole in the carpet so that the pile of the carpet faces up.
The pipe is threaded into the hole
Step 12: Glue the carpet to the wood base.
The carpet is glued to the base
13. Processing the pipe with sandpaper
Step 14. Prepare two pieces of carpet about 10-15 cm high and a length equal to the circumference of the pipe. Wrap them around the pipe at the top and bottom, and glue them in place using a glue gun.
A piece of carpet is glued
Step 15. Cut a circle of pipe with an equal diameter from the carpet. A circle is cut out of the carpet
Step 16: Glue the carpet circle as a plug onto the top of the pipe. You can glue with a glue gun.
The circle is glued as a plug
Step 17. Return to the base. To ensure that the carpet curls well, cut off the excess as shown in the picture. Excess carpet is cut off
Step 18. Fold the edges of the carpet and secure them with a stapler.
Curved edges are fixed with a stapler
Step 19. The base is completely ready. Now take a jute rope with a diameter of 12 mm. Such a scratching post will require about 18 m. Next, using a glue gun to fix the harness at the beginning, wrap it around the bracelet. Jute wrapped around a pipe
Step 20: Wrap the pipe completely with rope. At the top, secure the edge of the rope with a glue gun. To be sure, you can glue a few turns in the middle. several turns can be glued
Step 21. The scratching post is ready. Using the same principle, you can make a claw sharpener not from pipes, but from a thick block. An example can be seen in the video below. Do-it-yourself finished scratching post from a pipe
How to make a scratching post house
You will spend much less money on creating such a house than buying a ready-made one in a store. True, be prepared for several hours of your free time. The speed of production of such products directly depends on the availability of appropriate skills.
Step 1. First of all, let's deal with the base. Plywood or chipboard is suitable for it. Using a jigsaw, cut out a fairly large rectangle with rounded edges. The corners of the workpiece need to be rounded
Step 2. Next, cut out a partial circle from the same material using a jigsaw. You will need 2 pieces of such parts. An incomplete circle is cut out
An incomplete circle is being cut out. An incomplete circle is ready.
Step 3. Now you will need a sheet of fiberboard. Attach your partial circle to it, circle it and cut out the resulting part. You need 2 of these parts. An incomplete circle is circled on the fiberboard
Step 4: Next, attach one fiberboard semicircle to the plywood semicircle.
Fiberboard blank glued to plywood
Step 5. In the second semicircle, cut a hole the same shape as the semicircle.
A hole is cut in the second incomplete circle
Step 6. Take the rectangular base, fix both semicircles as shown in the figure (do not screw it with screws yet). Between them, make a jumper from a block. timber lintel is installed
Step 7. Next, find the resulting structure and cover it with padding polyester, and then with finishing fabric. It is convenient to fix the material with a stapler. The structure is covered with padding polyester
The structure is covered with padding polyester Fixing the finishing fabric
Step 8: Take a piece of trim fabric and place it right side down on the round piece. Next, secure the material with a stapler. Place padding polyester on top of it. The fabric is fixed with a stapler
Step 9. After this, cover the house with plywood, fixing the material well on the semicircular base. The house is covered with plywood
Step 10. Straighten the padding polyester and finishing fabric, stretching them over the “roof” of the house. Fix it on the back side of the house on a wooden base. Make sure that the materials are well stretched. Materials must be well tensioned
Materials must be well tensioned How to fix materials
Step 11. Using a glue gun, glue the materials along the lower edges of the sides of the house. Glue gun used
Step 12. Take the second semicircle of fiberboard and cover it with finishing material. The second semicircle is tightened
Step 13. Using a glue gun, glue this semicircle of fiberboard to the back wall of the house. The semicircle is glued to the back wall
Step 14. Using the same principle - using a stapler and a glue gun - cover the bottom of the structure and prekikikimokimamekiremamanik It's ready. The bottom of the house is attached
Step 15 Now get to work on the scratching post. Use a plumbing pipe or linoleum reel as a base. Place it on a piece of wood (chipboard, plywood) and draw two circles. A circle is drawn
Step 16: Using a jigsaw, cut out two wooden circles. Grind down the edges to make them smooth. A round workpiece is turned
Step 17. The resulting circles serve as plugs for the pipe. Insert them inside the pipe and secure with self-tapping screws. The plugs are fixed with self-tapping screws
Step 18. Begin wrapping the pipe with rope, securing its end at the bottom using ropes.
The pipe is wrapped with rope
Step 19: Do not block the top end of the rope once you have wrapped the entire pipe. Upper end of the rope
Step 20. You will need long screws
Step 21. This will be the top resting area for the cat. This will be the top platform
Step 22 Screw the circle to the pipe. But over the first side down. The diameter of a circle made of fabric is the diameter of a circle made of wood. The circle is screwed to the pipe
Step 23. Cover the top of the circle with fabric and padding polyester using a glue gun and stapler.
Covering the upper platform
24. Upper playground
Upper play area DIY scratching post house
The scratching post is ready. If desired, the upper platform can be supplemented with a side, and a toy can also be attached to it.
How to choose a scratching post
Having familiarized yourself with the types of scratching posts, you can begin to choose the most suitable option.
If we consider a scratching post from the point of view of functionality, then it is definitely worth considering a scratching house or even a whole complex consisting of many different tunnels, shelters, shelves, ropes and horizontal and vertical surfaces for sharpening claws.
Many cats are extremely inquisitive, so such a design with an abundance of various interesting places will definitely not go unnoticed by your pet.
Despite all the advantages of a scratching post house or scratching post complex, this option is not a budget option. If it is not possible to allocate funds for this design, then you can take a closer look at budget options.
- An inexpensive scratching post for a cat is, first of all, a small post scratching post.
- In addition, this type of scratching post takes up little space and is easy to move.
- They often come with a special toy on top that attracts the cat's attention and encourages her to reach up and even jump onto the top.
- This way, the cat becomes interested and will claw in more often, and then begin to fully use the scratching post.
When choosing a suitable scratching post, you need to pay attention to the vital activity of the animal. If your pet is active and mobile, then you should consider a wall-mounted scratching post, complex or post. But if the pet is, on the contrary, passive, loves comfort and moves little, then you definitely need to choose a horizontal surface of the scratching post.
How long will a scratching post last?
Any, even the most expensive branded scratching post, wears out over time and loses its original appearance. The frequency of replacement of the scratching post depends primarily on:
- Product quality.
- Conditions of its operation.
- Caring for her.
So which one should you choose? Advice from cat owners will come to the rescue. The rating is based on customer reviews:
- Sisal scratching post. Can last up to 3 years. This is a conditional figure. The thicker the sisal rope, the longer it will last.
- Jute model - up to 2 years. Also depends on the thickness of the rope.
- Carpet - about 1.5 years.
- Faux fur, which can often be found in cat complexes - up to a year. And this is subject to regular cleaning.
- There are two types of cardboard. Whole cellulose, higher quality, lasts up to six months, double-sided cellulose - up to 12 months. Waste cardboard, the cheapest, is thrown away 2 months after purchase.
The sisal scratching post lasts the longest!
Which scratching post is better
In terms of overall functionality, any cat would probably vote for a play set that included scratching posts. But if we talk about the claw machine itself, in combination or separately, the answer will depend on several factors.
If a model is chosen for an adult cat, you need to take a closer look at the position in which he sharpens his claws. Cats that scratch doorframes and walls will love a wall-mounted scratching post or post. If the cat scratches the carpet or sitting surfaces, a variety of beds and rugs are suitable.
For young, active and light cats, it is worth choosing a column. Even if a cat refuses to leave sofas and doors alone, by climbing onto a post to play, she will wear down her claws and be less likely to scratch other things. The vertical structure takes up little space and is easy to transport, so the column is a good alternative to a play complex in a rented apartment.
The easiest way to accustom a cat to a cardboard scratching post. Cardboard resembles wood, a material that cats sharpen their claws on in their natural environment. The product is cheaper than others, but also less durable.
The wall-mounted scratcher does not take up space and will not tip over when the cat furiously rushes at it, getting rid of excess energy. But to install it you need to drill into the wall.
Mistakes when making a cat scratching post
The most common mistakes when making a scratching post yourself are related to the wrong choice of step-by-step instructions:
- To create a vertical scratching post, use a rope that is too thin and weak - the cat will quickly tear it apart.
- Horizontal rugs are covered with poor quality fabric.
- Instability of the posts - if the structure falls and frightens the cat, it will no longer approach the cat.
- Exposed elements of metal fasteners, screw heads or other similar parts can be rubbed off.
- The use of synthetic fabrics and adhesives can cause poisoning.
Option 1: on a patterned carpet
Commercial scratching posts are unlikely to fit the design of an apartment, but you want every detail to be in its place and look harmonious. For a designer column you need to find:
- sisal rope;
- rug;
- stapler;
- the base is a small beam, stick, metal rod.
On a piece of carpet, a place in the center is determined where the pillar will be placed. Using super glue, the base (beam) is placed. Then it is simply wrapped in sisal. Additionally, you can paint part of the rope so that the scratching post fits harmoniously into the interior. The carpet is selected individually; a small piece can be purchased at any market (trimmings/remnants are often used for these purposes). Photos of a hand-made scratching post for cats can be studied on the Internet.
DIY scratching post repair
Most often, owners have to deal with the restoration of fabric and rope elements of construction:
- It is better to completely remove the weak and thin cord from the vertical posts and replace it with dutons.
- Damaged new fabric upholstery is replaced.
- Corrugated cardboard scratching posts are not worth repairing - they are simply thrown away and repaired.
- With wooden houses you have to tinker - you need to disassemble the entire structure; you have to tinker - you need to disassemble the entire structure, correct defects. If the project is installed with high quality, then there are no problems with it, I’ll stick to it.
Scratching post houses cause trouble only in one case - if they are assembled with self-tapping screws, bolegez uker Large cats weaken the structure and it quickly fails.
Option 7: scratching post made from cans
There may not be beams or metal scraps in the house, so you can make a small scratching post from 3 cans (for example, from food). They are washed well, cleared of stickers and dried. To make the structure stable, they can be filled with sand or earth. Next, they are collected in a column and fixed with hot glue.
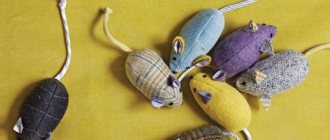
The final step is wrapping with twine or string. Such a structure can simply lie on the floor next to the pet’s sleeping place. The most important thing is to train the cat; catnip or his favorite toy, which can be attached to it with a rope, will help to do this.
How to train a cat to use a scratching post
An animal should be accustomed to a scratching post from the first days of its appearance in the house. Same as for the potty. If the baby is taken from the mother, then there will be much fewer problems with him. In the new home, not only will he already know where to go to satisfy his physiological needs, but he will be able to more easily cope with his feelings of the familiar smell from the scratching post.
Pets from a shelter are often familiar with a scratching post, so at home it’s enough to build an analogue of the house. But with cats picked up on the street, who are also quite old, you will have to tinker. Animals accustomed to complete freedom often refuse to take anything into account even after dosozantegunogozantegunogaun - the owner will have to work hard.
You shouldn't have high hopes for valerian or catnip. Animals, like people, each have their own character. And what is sweeter for one does not evoke any emotions for another. If herbs and spells do not help, observe where your pet prefers to sharpen its claws. What kind of surface is it - horizontal or vertical? What does he like best - wallpaper, upholstered furniture, door upholstery or wall plasterboard. And then all you need is a little imagination, and love for this shaggy terminator, just a little imagination, and love for this shaggy terminator, which you can also play on his primary instincts. Place a scratching post that smells like another cat in the right place - success is guaranteed from the first days. The animal will carefully “scratch” the marks of a competitor who has encroached on its territory.
Why make a scratching post yourself?
Some readers may well ask a logical question: why make a scratching post when it’s easier to buy one? It is indeed easier to buy, but not all products are cheap and safe for animals. When making a scratching post yourself, you will use only materials that are familiar to you, build it in such a way that even during active games the cat will not drop it or get scared. And, besides, you can save a lot of money , because large and beautiful scratching posts sometimes cost a lot of money.
There are different scratching posts for cats
Important! Experienced cat owners recommend changing the scratching post about once a year. Over time, its surface wears out and is no longer useful for cat claws. That is why the product will require replacement. A scratching post is definitely not enough for even one cat’s entire life, what can we say if you have several of them?
The scratching post needs to be changed once a year
A store-bought scratching post may not be to your pet's liking. And, as you know, cats are animals with character , and if they refuse to use the purchased option, then you cannot do anything about it. This means that the money spent is money down the drain.
What is a scratching post for?
Without a scratching post, your furniture will suffer.
Sometimes pets refuse to use a nail sharpener just because of its smell - a factory product can smell unpleasant to animals.
Not every scratching post is suitable for your cat.
That is why we recommend observing the animal, understanding what surfaces it likes to scratch, and, based on this, try to make a scratching post yourself. This will be a good device that can even be created to match the interior of the apartment. Yes, you will spend some time making the product, but believe me, no one will make a scratching post for your cat better than you.
Try making your own scratching post
Original wall scratching posts
How to discourage a cat from sharpening its claws in a “forbidden” place
| First of all, a certain smell will help. Animals have a more highly developed sense of smell and some aromas are categorically unpleasant to them. The smell of alcohol, for example, or perfume.
Cats don't like the smell of all citrus fruits. You can purchase a special spray based on aromatic oils at the pet store. All rights reserved.
| Usually animals quickly abandon places where they are supposed to be in danger. A loud bang, a stern hail, and wrapping furniture in cellophane are also effective.
Many people recommend “water procedures” from a spray bottle, but this is possible if a cat is somewhere nearby trying to sharpen its claws, and the owner is sitting fully armed, waiting for her. Everyone can invent the ability to dare an animal themselves, knowing all its pros and cons.
.
scratching house
The claw house is a complex of claw posts and surfaces for sharpening claws.
- All of them are located in such a way that the pet can move around the house without obstacles.
- Houses can be designed in various variations, but most often they consist of several floors and tiers, and post scratching posts support them.
- In addition to places for grinding claws, the house also has a cozy shelter.
Some cats like to rest away from public view, so a small hiding place is the best place for your pet.
Should I have an onychectomy?
Finally, we should remind you of the operation permitted in some countries to remove the claws of the Domanikomanina Yes, this procedure will save the owners from a lot of trouble and will preserve the furniture, but is it really that harmless? After all, along with the claws, the front phalanges of the fingers are removed, which affects the work of the entire support system.
A cat is a fairly mobile animal and without claws it is doomed to endless injuries - clinging is impossible. She will not be able to climb onto a low surface; it will be difficult for her to maintain balance. After the operation, you may suffer from pain for the rest of your life, which is due to a violation of the habitual state of the body.
Which is better - a purchased scratching post or a homemade one?
The range of scratching posts in pet stores is extensive: from simple to complex designs, from samagazired (3
The disadvantage of purchased scratching posts is that they are rarely stable. This is an important factor, because the structure must support the weight of a cat, even a large breed, if it suddenly decides to climb. In addition, the device must be made of strong and durable materials; scratching posts from pet stores rarely meet these criteria.
For the sake of a high-quality and durable design for sharpening cat claws, the owner will have to shell out a lot of money, which many cannot afford. It will cost more to build a scratching post with your own hands from scrap materials.
Everything must be safe and sound
To prevent damage to property, you need to give your fluffy a special set of tools. A DIY cat scratching post or one purchased in a store will solve the problem. Believe me, the pussy will only be grateful for such a gift.
In addition to damaged furniture and clothes, your pet may develop problems in the form of cracks and chipped claws. It's not just ugly, it's also quite painful.