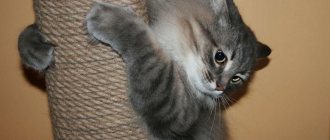
Why do you need a scratching post?
In nature, claw marks of lions, tigers, and leopards are found on tree branches, high from the ground. Domestic cats have retained the habits of their wild relatives. She:
- necessary for cleaning claws from worn outer horny film;
- scratches will tell relatives: there is a representative of the species here;
- accompanies stretching;
- attracts attention.
Declaw surgery
Some cat owners prefer not to use scratching posts, but to solve the problem radically - remove the pet's claw phalanx or stick anti-scratch pads on the claws. This operation is similar to the removal of human fingers and makes the animal permanently disabled. A cat, deprived of nail phalanges, is forced to re-learn how to walk and jump, and will no longer feel like a full-fledged cat. An animal without claws loses its balance, feels defenseless and easily suffers damage to its internal organs. If a pet without phalanges accidentally ends up on the street, the chance of survival of such an animal is close to zero. Most veterinary clinics do not agree to perform such procedures.
Sharpening claws is a natural need for a cat
Not vitally important, like eating, sleeping or going to the litter box, but scratch marks will cause the animal to lose a significant amount of comfort. Owners have to regularly change chairs, upholstery on upholstered furniture, and throw out boxes. Purchasing a cat scratcher will help in part. How to choose her so that she will be successful with the beast?
- choose a covering: from corrugated cardboard to sisal, as long as the animal likes it;
- find a comfortable place - one where your pet likes to sharpen its claws, but don’t forget about yourself, everyone makes this choice together;
- think about the shape, color and fastening.
You may be able to find one that is approximately suitable at a pet store. But purchased products are disposable and will soon deteriorate with intensive use. It’s possible to make a repairable cat house with your own hands.
What materials to make cat scratching posts from?
Typically, jute or sisal rope is used for these purposes. This is the most popular material for scratching posts.
If you need to save money, feel free to choose jute rope - it is cheaper, but at the same time it does a good job of its main task.
To ensure that the scratching post lasts as long as possible, choose sisal rope. It is more expensive, but also much stronger than jute.
But thick ropes are not the only material that can be used to make a cat scratching post. What else can be made from?
Use any available materials you can find in your home.
For example, some cat owners choose paper structures (meaning thick corrugated cardboard) instead of rope ones.
There are many options for how to use the materials - individually or in combination with each other (this will depend on what exactly you have on hand and what you are willing to spend on).
For example, you can make a cardboard frame and wrap it with rope using hot glue. As a frame, you can use plywood, chipboard (for example, from old furniture), or a plastic pipe.
Or you can make a simple column from cardboard circles (in this case, rope is not used at all). And the cost of a homemade design will be lower.
True, a cardboard scratching post will not last long. But on the other hand, you can quickly replace it. In general, you can take note of this idea!
Alternatively, you can make an indoor cat scratching post out of wood.
But for this you will need a more serious tool in the form of an electric drill, a jigsaw and a grinder. However, any owner should have such a tool at hand.
To make a homemade scratching post, use carpet scraps left over after repairs. Cheap and cheerful! For many people, this is the best option, since there is no need to buy a rope and tinker with it.
Shapes of scratches
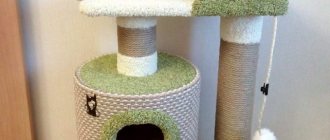
How to design a cat scratcher? It depends on the size of the apartment, the cat’s manners and the imagination of the owners. Experts in cat psychology say: animals need to periodically remain alone where they can be found - at heights. Cat climbing frames are suitable for this:
- “cat trees” - branched structures with shelter,
- the cat house can be placed on the floor - with surfaces for “manicure” inside, on the roof or on the base of the structure;
- thin shelves mounted on the wall with covering in separate areas for claw points;
- flat or volumetric wall scratching post.
Choose a form factor based on the safety requirements of the animal and convenience for humans. Let's look at how to make a scratching post yourself from scrap materials. You have to make a set of elements and connect them in a certain sequence.
Basic rules for securely installing a scratching post
Wall and floor products must be properly attached to the surface. If the fastening is weak, then under the influence of the weight of the cat during the process of sharpening nails, the structure may fall and frighten the animal. There is a high probability that the animal will not only be injured, but also lose interest in the product.
When installing a floor-mounted option, you should also check the stability, because if the scratching post does not stand well enough and is not additionally attached to the floor, then the structure may move during games and irritate the animal. Top tips for installing sharpeners:
The claw scraper must be stable, and all its parts must be well secured.
- It is better not to use nails as fasteners for a scratching post made by yourself from scrap materials. Self-tapping screws are considered more reliable, and a structure made from them will be more stable.
- If you have to use nails or staples, you should not do it on the front part, because the cat will cling to them and may get hurt. It is best to hide the fasteners on the back side.
- Mint or catnip leaves placed under the upholstery will help prevent the formation of mold and the proliferation of pathogenic microorganisms. In addition, plants can attract the attention of an animal.
- It is recommended to make wall structures with two hinges located in the corners. In this case, the structure will be securely fastened, as a result of which the cat will not be able to move it during the sharpening process.
Helpful advice! Most tailed animals prefer to sharpen their claws in the morning after waking up, so you should install the claw grinder near the place where the animal is used to sleeping.
As for other tips regarding where it is best to install a scratching post, pet owners recommend doing it where the animal scratches the surface most often. If it is a protruding corner of the wall, the sharpener should be placed there. The main thing is not to place the product too close to the surface, because the cat can use both surfaces.
The scratching post must be securely installed so that the cat cannot knock it over.
If possible, sharpeners should be installed in all places where the pet left marks. Just for his safety, it is not recommended to attach the sharpener to the door frame, so that no one accidentally crushes your pet.
Top part
We have already stated that the pet chooses the upholstery. How to line a cat house or cover a surface for sharpening claws:
- carpet - cheap fabric for a scratching post, average maintenance, technically the most difficult to replace;
- jute rope - inexpensive, easy to replace, short-lived;
- sisal - the most durable, but also expensive;
- corrugated cardboard - cheap, but short-lived;
- with a wooden block - few people like it, but the labor costs when working with it are minimal.
Animals, of course, do not differentiate between sisal and jute (by the way, if you decide to try jute and like it, you can then replace the rope with sisal). Few people prefer unsanded wood, but sometimes it is the ideal scratching post for cats.
What should I scratch my claws on?
The base of the claw cleaner can be anything strong enough; We will return to this issue later. Much more important is the “abrasive” itself: the cat’s scratching post must be strong enough to remove the keratinized layers, but not excessively, so as not to damage the living tissues of the claw.
For the same purpose, the material of the cleaning surface should be fibrous and moderately rough, not too fine, but not too rough. To prevent the claw from getting stuck and tangled in it, the tensile strength of the fibers of the material should be lower than that of the “plastic” of the claw, but again, not excessively, otherwise nothing will peel off on it. Finally, cats sense electricity. Not nearly as subtle as fish, but they still feel it. Therefore, claw cleaning material should allow static electricity to flow away, but should not be highly electrically conductive. These requirements are fully satisfied by natural materials:
- Wood, but not all wood, see below.
- Hemp hemp and woven/twisted products made from it: burlap, carpet bases, ropes, ropes.
- Jute hemp and the same products made from it, plus coarse furniture fabrics.
- Braided coarse wool products: drape, tapestry, old greatcoat cloth or green cloth for gambling tables.
- Packaging corrugated cardboard – for kittens and small weak decorative breeds
Synthetics of any type are not suitable: their fibers are too tensile, but at the same time too smooth and slippery. As well as sisal and manila hemp fibers. The cotton fibers are very weak, the cat will tear them, but will not clean the claws properly.
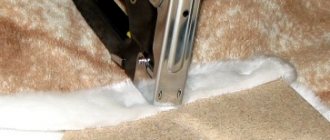
Note: metal and plastic fastening/supporting parts in the scratching post (see figure) accessible to the animal should be avoided if possible - metal instantly removes static, which is unpleasant for the cat, while plastic, on the contrary, accumulates it itself. In addition, both of them can tear your claws.
Incorrect use of metal in a cat scratching post
Tree
A wooden scratching post is most suitable for a cat: he is the original owner and protector of his site. He needs his claws not only for hunting weak prey; the cat must be ready at any moment to enter into battle with an equal or even stronger person. Therefore, cats' claws are renewed more slowly than those of cats, but are more durable. The tree for the cat’s scratching post should be a strong, absolutely healthy, straight-grained one. Birch is suitable for deciduous trees; their conifers - everything except spruce. In any case, the wood must be well exposed to air and light (and not in the shade, as is sometimes written) so that its fragile viscous volatile (and odorous) components are completely weathered or bituminized; At the same time, the tree turns gray, and in conifers the layering clearly appears. Look at the picture: such a serious man won’t scratch his claws on anything. Yellow plaque is nothing, it’s a lichen, harmless and safe.
Wood suitable for cat claw point
The second condition is that the wooden scratching post must have a straight-layer section free of knots with a height no less than the height of the animal without a tail. It is on this that the cat will tidy up its claws. It is best to start from the floor or bed to make it easier to tear the back claws. Product on item 1 Fig. Suitable for kittens who do not yet know how to climb properly, but as they grow older, they will begin to look closely at baseboards, wallpaper and furniture. But what’s in pos. 2, suitable for a cat of any age, does not require purchased material and is compact enough for installation in an apartment.
Wooden cat scratching posts
Smooth-haired cats are generally energetic, tenacious, and willing to climb. A wooden scratching post for them can be made from fairly thin branches with bark, pos. 3. Long-haired dogs are more phlegmatic and are not particularly good at climbing, so the wooden piece needs to be wrapped in rope (positions 4 and 5). A thick branch, partially wrapped, is suitable for both, pos. 6.
Base options
Item needed:
- strong enough to support the weight of the animal;
- lightweight so that bulky structures are not required for mounting to the wall;
- Receptive to glue well, good for processing with tools.
Cheapness is an important parameter, but not as much as for coating. The base is expected to last a long time. Is this always necessary? Assess the complexity and wear time of the craft. It may turn out that it is more rational to replace it completely than to remove the glue.
For the base take:
Note!
- How to make wooden shelves with your own hands - original design options
- Kinusaiga technique for beginners: what is it, a description of creating paintings from threads
- How to weave a figurine from rubber bands: how to learn to weave animals, toys and what you can make from rubber bands on a slingshot
- plastic water and sewer pipes - they are easily sawed across and lengthwise, it is easy to make a frame of any shape from them with reliable fastenings from standard adapters;
- pieces of plywood of various thicknesses;
- sections of tree branches after sanitary pruning at the dacha (necessarily healthy fragments, so as not to bring pests into the house).
The branches can also be used for decoration: a cat lying on them, attached to the ceiling, will decorate any apartment.
With or without claws?
Is it possible to do something with the cat to prevent it from scratching? Veterinarians know 8 or 9 ways to deprive her of this opportunity. But after the most “humane” of them, the animal will feel like a child playing with tightly bandaged hands or walking in a straitjacket. Impacts of “moderate severity” will cause sensations in the animal approximately the same as filling a carious tooth without painkillers in a person, and they will have to be used regularly: cat’s claws are constantly growing. And “radical” methods generally smack of fanaticism and leave the animal disabled.
Horizontals
They are divided into shelves for walking, areas for resting or placing a “birdhouse” and hammocks.
The platforms can also serve as steps to make it easier for your pet to climb to the very top of the structure. They are made from plywood. Sheets Ш1 or Ш2 are suitable, any grade except IV (falling out knots and cracks will affect the strength), birch is better than pine needles (cats are sensitive to odors), moisture and fire resistance do not matter.
The recommended thickness is from 6 (if you have a not too large cat) to 10 mm. Covering them with a covering for the claw point is worth it if the structure will be on the floor. In other cases it is a matter of taste. The technology is the same as for vertical surfaces.
Wall-mounted scratching post for upholstered furniture
This model is especially for a cat who does not want to change his favorite sofa for anything else.
You will need 3 wooden boards. One is for wrapping with sisal rope, the second is slightly wider in size than the sofa armrest, the third will hang from the inside of the sofa as a retainer. In general terms, the design resembles the letter G and is hung on the side back of the sofa.
cat house
This is a shelter with a single entrance, located far from the routes of people, higher above the floor. Dimensional diagrams and drawings can be found at the end of the article. Cats love boxes. Your task is to create something similar, but one that fits into the interior.
If you plan to place the house on a cat tree, take care of its stability and balancing issues, but for this it is enough to have a building level and at least three support points for the plywood base.Tips on how to make a cat house spend a lot of time on interior and exterior upholstery. An external one can be useful for a furry pet to sharpen its claws - but only if the shelter is not located at a height.
Otherwise, decorate it however you want. What will be useful inside is not upholstery, but a mattress that fits the internal size of the floor, possibly with sides. It can be taken out and washed. The animal doesn’t care, and it’s much easier to maintain hygiene.
What to consider when making
Before choosing a scheme and method for making a scratching post, you need to take into account, calculate, decide in advance on the size of the product, shape, what material to choose, place for placement and the further possibility of repairing the scratching post.
Size matters
The principle here is that the more, the better. The design should not be smaller than a cat. Even if you do a fight for a kitten, it should still be high, because the baby will soon grow up. A cat will simply not be interested in or comfortable with a small scratcher, because she likes to reach higher and further away.
If a floor structure is planned, the animal must fit completely on it (with front and hind legs). If it’s a vertical post or wall, make such a calculation so that the cat can accurately reach with its front paws and still have a little space left.
Base material
When choosing a material, it is better to give preference to natural wood or cardboard. These are soft enough materials that your pet won’t be able to injure their claws when sharpening. But it is permissible to use chipboard, fiberboard, and plastic sewer pipes, especially when it comes to the construction of an entire play complex.
Coating and winding material
For covering scratching posts, carpet and carpet fabric have the best qualities. It is recommended to purchase carpet for home use only. Office ones, as well as very cheap ones, are made on a rubber basis, can smell unpleasant, and be unsafe for the animal.
It is better not to use artificial fur or fabric, as they are short-lived, and fur tends to accumulate static electricity. The cat will be afraid of this design.
Jute (hemp) rope is made from industrial hemp, so it is safe for your pet even if swallowed.
Also, its advantages are that it is cheap, soft, and a good option for kittens. Disadvantages - when used, debris flies from jute, as it peels off into fibers. I'll have to clean more often.
Sisal rope is also made from a plant base (agave) and is not harmful to the animal. It is strong, but, like jute, it leaves behind debris. Another disadvantage of sisal is that during use by a cat, the scratching post can sag and become wet.
Cotton rope is also used to make scratching posts. It is reliable, safe, and due to the white color of the rope it gives the product more aesthetics.
Which of the presented options is better, each owner decides for himself.
Installation type and shape
Determined based on the size of the apartment and the availability of free space. Because you can make a nail sharpener in the form of a column or a floor-mounted horizontal one, or you can mount it on the corner of a wall.
Form – the simpler the better. The fewer corners and protrusions, the less the risk that the cat will damage its claws. This design is easier to repair when the coating fails.
How to make a cat house with a scratching post
How to make a house for a cat with a scratching post? A shelter located in a cat tree cannot function as a scratching post. Therefore it must be on the floor. The shape of the cat’s home in this case should be either cylindrical or with a gable roof.
In the first case, a PVC sewer pipe is suitable. They come in diameters of 300, 400 and 500 mm. They cover the outside of the tube in the same way as vertical scratching posts. The second one will require plywood. Make the roof higher and longer.
Option #3. Scratching post made from plumbing pipe and rope
In this master class you will see how quickly and easily you can make a scratching post using a regular sewer pipe and rope. It seems like a lot of work, but in reality creating such a nail sharpener will take little time.
Step 1 . Take a plastic pipe, which is used for sewerage, with a diameter of 7 cm and saw off the socket from it using a regular hacksaw.
The socket is cut from the pipe
Step 2 . The length of the pipe blank should be 70 cm. If the pipe is too long, cut off the excess.
The pipe must be 70 cm long
Step 3 . Take 4 ordinary furniture corners. and, attaching them to the pipe, make marks on it in accordance with the fastening holes on the corners. Drill holes with a suitable drill bit.
Holes are drilled in the pipe
Step 4 . Attach the furniture corners to the pipe using bolts and nuts. Be sure to tighten them well to keep the connections strong.
Furniture corners attached
Step 5 . Take a sheet of plywood or chipboard and cut a piece of it measuring 50x55 cm.
Cut chipboard sheet
Step 6 . Turn the piece of plywood over and mark the middle.
The center of the workpiece is marked
Step 7 . Place the pipe so that the center of its hole and the center of the plywood sheet coincide. Mark the places that coincide with the holes in the furniture corners.
Marking holes in furniture corners
Step 8 . Drill holes in the plywood using a drill and then screw the base to the pipe. The pipe will be held in a vertical position thanks to the corners that securely hold it.
The pipe is screwed to the base
Step 9 . Now take a piece of carpet and mark the middle. The piece should be approximately 60x65 cm in size.
The middle of a piece of carpet is marked
Step 10 . Next, cut a round hole in the middle area with the same diameter as the pipe. It is most convenient to cut with a stationery knife.
The hole is cut with a stationery knife
Step 11 . Insert the pipe into the hole in the carpet so that the pile of the carpet faces up.
The pipe is threaded into the hole
Step 12 . Glue the carpet to the wooden base.
The carpet is glued to the base
Step 13 . Treat the lower and upper parts of the pipe with sandpaper and degreaser approximately 10-15 cm up and down.
Sanding the pipe
Step 14 . Prepare two pieces of carpet about 10-15 cm high and a length equal to the circumference of the pipe. Wrap them around the pipe at the top and bottom, and glue them in place using a glue gun.
A piece of carpet is glued
Step 15 . Cut a circle from the carpet with a diameter equal to the diameter of the pipe.
A circle is cut out of the carpet
Step 16 . Glue the carpet circle as a plug onto the top of the pipe. You can glue with a glue gun.
The circle is glued as a plug
Step 17 . Let's go back to the base. In the area of the corners, so that the carpet bends well, cut off the excess, as shown in the figure.
Excess carpet is cut off
Step 18 . Fold the edges of the carpet and secure them with a stapler.
Curved edges are fixed with a stapler
Step 19 . The base is completely ready. Now take a jute rope with a diameter of 12 mm. Such a scratching post will require about 18 m. Next, using a glue gun to fix the rope at the very beginning, wrap it around the pipe, starting from the bottom border of the carpet.
Jute wrapped around a pipe
Step 20 . Wrap the pipe completely with rope. At the top, secure the edge of the rope with a glue gun. To be sure, you can glue a few turns in the middle.
Several turns can be glued
Step 21 . The scratching post is ready. Using the same principle, you can make a claw sharpener not from a pipe, but from a thick block. An example can be seen in the video below.
Do-it-yourself finished scratching post from a pipe
Articles on the topic
DIY dog bed
Video - Scratching post made from pipe and rope
Video - Rope and wood scratching post
Crafts made from corrugated cardboard
The simplest scratching post for cats is made from corrugated cardboard. To do this, unfold an ordinary box and cut it into strips 8-12 cm wide. Then they are either glued together in layers or rolled into a “snail”. It is often recommended to fasten the layers together with PVA glue, but pets lick and chew such products, so make a starch paste at home.
Device
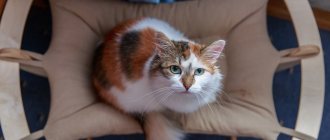
Cat on a bed
To tear through the cat’s claws, at worst, a simple post or board will suffice, pos. 1 in Fig. However, it is better to complement it with a bed, pos. 2. Firstly, in nature, cat markers are not equivalent. One of them, with an elevated bench for relaxation and an observation deck above it, is the main one, the capital, so to speak. It is not necessarily in the center, it can be on the periphery. The cat's territory in the home is limited. You can do without boundary (contour) markers, but the main one will give the cat dignity, which, in turn, can well decorate the interior, see fig. on right.
Scratching posts for cats with a bed
But to combine a scratching post with a house, and even installed below, as in pos. 3, should not. In natural conditions, the cat's den is never combined with the main marker, for safety reasons. Some exceptions are cats of Asian origin: Siamese, Bengal, Abyssinian, etc., the territory of whose ancestors in the jungle is limited to an area of just one tree. But then the house must be elevated and equipped with 2 exits: a spare one perpendicular to the main one and opens onto an additional platform, pos. 4.
It is best if the scratching post with a bed and viewing platform is not a straight column, but a branched one, somewhat reminiscent of a tree, pos. 5. This can be built from cardboard pipes, see below. And on to the next. rice. – drawings of scratching posts with a climbing frame and platforms: on the left for energetic and jumping cats, and on the right for phlegmatic and sedate cats.
Drawings of scratching posts with beds and climbing frames
About the sites
Houses, toys, climbing frames and beds for cats are actually a different topic. In relation to scratching posts with platforms, it would be appropriate to say that the bed and the “observatory” do not need to be covered: cats have soft fur of their own. If you want to visually ennoble the product, then you don’t need to fasten the fabric like furniture, with nails or staples: metal can tear off a claw if it gets caught, and it conducts electricity too well for cats.
Cat areas are lined with PVA glue: when dried, it is odorless and is harmless and indifferent to cats. Step-by-step instructions for covering a cat bed with fabric are as follows:
- We cut with an allowance for the edge thickness plus 25-30 mm;
- We cut out the base (plywood or board 16 mm thick) with rounded corners so that the folds on them are small or can be completely dispersed;
- Apply glue to the upper part in rays and along the contour, see fig. on right. It is better to do this with a brush to immediately disperse the glue in a thin layer;
- Immediately, before the glue begins to set, we apply the fabric;
- We coat the edge with glue and, together with it, under the platform along the contour by 35-40 mm;
- We fold the fabric over the edge and tuck it under;
- From the bottom we pull the tight-fitting thread with a needle, zigzag along and across;
- Straighten the folds at the corners;
- We dry it for a day, there is no need to apply pressure;
- We cut off the excess fabric at the bottom along with the threads;
- Instead of overcasting, we impregnate the fold of the fabric on the underside with the same PVA, diluted by half with water.
Fastening
What fasteners are made of depends on the shape of the product. If you choose plywood, make sure to provide space for tight hinges and place them on glue before you begin to attach the outer covering.
If the base is voluminous, then a plastic clamp or metal tape will do. Please note that the craft will have to be periodically removed from the wall, so a detachable mount is preferable.
Shelves with scratchers for cats are attached like any other shelves; they can be additionally secured with triangles made of plywood.
A DIY scratching post is the best method to get what you and your cats need. If you're not sure which design will work, start with corrugated cardboard. This is short-lived, but it will allow you to decide on your pet’s tastes before making a more complex stationary structure.
Carpet scratch board
You can quickly and easily make your own carpet scratching post. To do this you will need:
- Wooden board or piece of chipboard.
- A piece of carpet or old carpet.
- Nails.
- Hammer.
The size of the wooden canvas is selected based on the size of the cat, because the structure made can be used as a bed and as a claw sharpener.
How to make a nail clipper:
- Place the rug with the wrong side up.
- Stepping back from the edge of the carpet, place the board.
- Wrap part of the carpet over the board and secure with nails along the entire edge.
- Carry out the same actions with the second part of the carpet. If the two layers overlap, they can be cut off with a knife or left as this will create an extra springy feel for the cat.
For the cat to start using the scratching post, just turn it over to the other side. If a fairly heavy tree is chosen for the scratcher, then it may not be secured, and the cat will still not turn it over.
DIY scratching post: photo examples of beautiful options
Please repost
0
“Cat's joy”
This is often called a furminator (a professional tool for salon care!) - a “miracle comb” with a comb-shaped, steel, durable blade and an ergonomic handle, which is also suitable for home use.
According to reviews, it is liked not only by cat owners for its high efficiency - it removes up to 90% of dead cat hair, but also by the pets themselves for its effect on the skin and fur coat.
There are two types: deluxe with an injector button for throwing hair off the comb and classic without this option - the blade is cleaned manually; There are differences in design and material, but not quality(!).
They are selected individually according to the width of the comb and the height of the teeth. The seller's advice or a veterinarian's consultation will help you. And follow the instructions!
Furminator brand “FURminatjr deShedding” (1300-2100 RUR) is the best! Its popular analogues: HelloPet (1000 rubles), TRIXIE (up to 900 rubles), Dele (350 rubles); They are a little lower quality.
Application
Bathe the tail and wait for the pile to dry completely (!).
Before combing, if there are tangles, remove them with a tangle cutter or scissors and make sure there are no skin ailments.
It is advisable to comb it with a comb or, as professionals advise, first install a knife with long teeth into the tool to straighten the tangled pile, and then use a knife with standard blades.
Start from the back, move to the sides and tail, and then to tender, often “forbidden” places - the chest and belly. Move the comb first easily, smoothly and lightly in the direction of hair growth (carefully near the genitals, on the paws and tummy), and then a little more intensely (but slowly and without fanaticism!). And when finished, use a wet napkin (or hand) to remove all residue from above.
Owners note that an incredible amount of fluff is combed out for the first time!
At the beginning of summer (during the heat) and during the molting period (spring and autumn), clean 2-3 times a week, the rest of the time - no more than once every 1.5 months, and in winter it is recommended to clean only once, i.e. because it’s cold in winter, but the animal loves warmth. For short-haired breeds, veterinarians advise no more than 8 times a year.
If there is no undercoat, then it cannot be used. And the breeds: shorthaired Balinese, Tiffany, Cornish Rex, Burmese, Don Sphynx, Peterbald, Oriental, Turkish Angora, Devon Rex, La Permian, Singaporean and some more.
You can and should (!): chinchilla, British, Scottish, Persian, Somali, Maine Coon, Ragdoll, Norwegian Forest, Siberian, Neva Masquerade, Kurilian bobtail and many others.
And if you’ve never brushed your furry one before, then it’s quite possible to gradually accustom him: start with less time, gradually increasing; petting while quietly communicating; treat you to your favorite treat before and after; It’s better to do it at the same time every day. The cat, an intelligent and perceptive creature, will quickly pick up on this pleasant dependence that you create, and each time it will behave more and more favorably. It will take a maximum of six months to completely get used to it. One review says: “The grooming process is now accompanied by loud purring and eyes rolling back in pleasure.”
What types of scratchers are there?
Manufacturers offer us two main types of cat scratchers - an arch and a corner model, which can be mounted on walls, as well as on the legs of tables, chairs and stools.
Arch scratcher
The manufacturer claims that this model combines a scratcher and a scratching post. Thus, it can satisfy two cat needs at once.
The scratcher with an arched scratching post is designed to satisfy two needs of cats - sharpening their claws and rubbing against objects.
The arch consists of a small base covered with carpet (supposedly a scratching post) and an arch made of brush and is called “Cat’s Pleasure”. The whole structure looks flimsy, and as a horizontal scratching post it doesn’t stand up to any criticism, it’s too small - usually scratching posts of this type are made long and ideally wavy. To make a cat show interest in the scratcher, there is a trick - a hole is found at the bottom into which catnip is poured.
Catnip is poured into the bottom of the scratcher to attract the animal's attention.
Such a comb costs 990 rubles in Russian online stores, in Chinese it is a little cheaper - about 690 (but the price there depends on the dollar exchange rate, so it may change).
This is where people are overwhelmed by greed - it seems like they need the product, they want to pamper the cat, but they don’t care about the money. Therefore, there is a way out - to do it yourself:
- Take a pair of brushes (for a toilet, for example) at a price of 15 to 40 rubles.
You can make a brush arch yourself from cheap brushes - Then they are unbent and connected, attached to an unnecessary piece of wood, which is covered with old fabric - the resulting structure is no worse than a store-bought one, or even better if the base is larger and heavier.
A homemade arch-shaped comb turns out no worse than a store-bought one
Corner comb
The appearance of the combs, which can be placed on various corner surfaces, may vary, but the essence is the same - it is a plastic brush for combing wool, attached to the wall with tape or using self-tapping screws.
An ordinary corner comb consists of two plastic brushes
The Chinese offer a sophisticated version. The kit includes a bag of catnip to attract your pet.
This curved brush consists of two parts, one of which is attached to the wall, catnip is poured into it, then the top part with the brush is put on and snapped into place.
The corner comb consists of two parts, mint is placed inside
This brush can be attached to all corner surfaces.
The comb can be mounted on any corner surface
What else can serve as a cat scratcher?
It is also suggested to use the legs of tables and stools wrapped in twine as scratchers.
The legs of stools wrapped in twine can serve as a kind of scratcher for a cat.
You can also install a cat tree. This design is really useful, and if there is space, it is certainly recommended for use. This is a real living and play complex for a cat, and you can scratch yourself on it too. A well-designed tree will fit into almost any interior, as long as the space allows it.
Tree houses for cats perform many functions