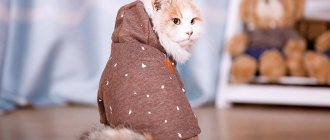
Welcome to my workshop! Today we will be doing creative work with our little ones again! On our agenda is a DIY fabric cat . I suggest trying to do it in several versions.
We diversify its production by using:
- different fabrics,
- cat patterns to get different models,
- and methods of decoration.
Craft material
Since our fluffy will be made of fabric, let's see what material is suitable.
Can be made from:
- Plain or multi-colored fabrics;
- Thin chintz and thick denim . But it’s better not to use stretchable knitwear if you want the shape of the craft to be preserved.
Think about what you will use to connect the parts, because the craft will be voluminous. And for this you need at least 2 parts, and filler between them. How to connect:
- Glue. Preferably one that grabs quickly and holds for a long time.
- Threads. How to sew a craft? It's easier to do this with a sewing machine. But you can do it with your hands.
- Cotton wool;
- Sintepon;
- Small cereals, such as millet, buckwheat, rice or peas;
- Sawdust is an ideal option if you want to add essential oils and use the cat as an aroma;
- Silicone balls.
You need to fill it tightly enough, stuffing and compacting the material.
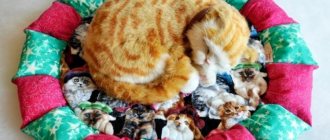
Pillows in the form of cats
Sewing a Cat pillow is not at all difficult, there are a lot of options. You can take any fabric, knitwear, and even burlap. The patchwork technique is well suited for this craft. This original pillow can be sewn without a pattern.
Let's diversify models
If you are doing it with your child, think about what he with his own hands . From here the complexity of the toy will depend.
Perhaps it will be:
- One-piece, as in the video . This is a very simple cat. In the video we do them with my son
- Or, consisting of several parts: head, body, paws, ears and tail. I will tell you about it further.
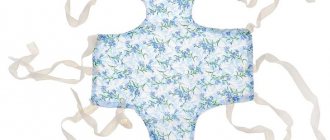
- Or maybe these will be cats in love ? Can you do this with a toddler? The principle is the same as with one-piece ones, just the shape is different. Click on the pattern, save and print, or simply trace on the screen, attaching a sheet, do not forget to scale the image as you need.
Take into account the age, abilities, and perseverance of your baby if you do it with your child so that it is interesting for him.
Pillow models and options
A novice craftswoman can easily cope with the task and sew an interesting decorative cat with her own hands.
For this you will need:
- A small piece of fabric (material parameters depend on the size of the future toy, taking into account spare centimeters).
- Beads or buttons for the cat's eyes.
- The pattern from which the product will be created.
- Tools (scissors, needle and thread for stitching elements). For thick fabric, you can use sewing threads; if appearance is important and you need to add shine to the toy, then floss will cope with the task one hundred percent.
- Filler (can be ordered online or purchased at a craft store).
Sew by hand if the toy is small. You can use a sewing machine if you have no experience in such work. Then the seams will be even and the product will turn out neat.
When you don’t have specific skills in creating toys, you can use simple patterns consisting of two parts. This will be enough for a beginning craftswoman to gain the necessary experience in stitching and correct, uniform filling of the product .
This toy consists of two parts. First, the pattern needs to be cut out of paper and transferred to the fabric using a chalk or felt-tip pen. Then cut out two parts. On one of them attach eyes (they can be drawn later or sewn on blanks in the form of beads or buttons) and a nose, the mustache can be highlighted with white threads.
Let's decorate our cats
If the cat , we need to decorate it. How to do it?
Let's look at the options:
- Using simple threads, embroider “eyes”, “nose”, “whiskers” and “smile” on the fluffy’s face;
- Make a cute bow on your ears, neck or tail;
- Button eyes will look great;
- A valentine or a flower in the paws of a mustachioed tabby will be very useful.
Now that we have disassembled all the components, let's start making toys .
Pillow toy
To make a toy you will need:
- fabric, linen or cotton, different colors;
- fabric for lining;
- decorative braid;
- a small piece of red tape for the tongue;
- padding polyester;
- filler – foam balls;
- button for the nose;
- beads from old beads;
- glue web;
- hidden zipper;
- threads, sewing tools.
How to sew a cat pillow with your own hands using a simple pattern
We need to prepare the following elements (dimensions are indicated without seam allowances):
- body – 40 cm by 45 cm;
- belly – 40 cm by 12 cm;
- tail – 9 cm by 25 cm;
- muzzle – Ø18 cm;
- back part – Ø18 cm;
- paw – 6 cm by 12 cm 8 pcs.;
- ear –9 cm by 9 cm (dimensions are given with allowances) 2 pcs.;
- bean pads – 6 cm by 10 cm;
- eyes (made of white fabric) – 2 pcs. with a diameter equal to the diameter of a 5 ruble coin;
- pupils (made of black fabric) – 2 pcs. diameter equal to the diameter of a 1 ruble coin.
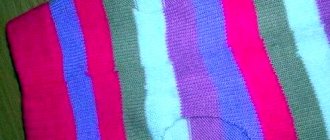
Torso
For the cat's body we prepare multi-colored strips 45 cm long. It should be noted that along the edges of the body they should be cut from the same fabric as the muzzle and back. We have chosen the following combination of stripes (see photo): 10 cm orange at the edges, 2 5 cm each towards the center, 2 6 cm each, two 4.5 cm each (these are different colors).
Sew all the strips, fold the seam allowances and iron them to one side.
For the lining, we cut out the blank, using the previous one as a pattern, with an allowance of 2 cm around the perimeter.
Fold the sandwich: lower rectangle, padding polyester, upper rectangle.
We pin three layers together, slightly stretching the top one. For this we stick pins in a checkerboard pattern.
Let's quilt our sandwich.
This can be done either using a special foot or without it, stitching the material with different simple or decorative stitches.
Trim the edges of the quilted rectangle.
If desired, you can decorate the pillow with decorative braid by stitching it into strips.
Paws
Let's draw a pattern for the paws. Its dimensions are 6 cm by 12 cm. We will sew the paws from orange and white fabric. The latter will need 15 cm by 33 cm.
Mark 4 pieces in orange. At the same time, do not forget that the cat has two left and two right paws.
We fold the orange fabric with the white one and pin it together.
We sew along the outlined contours.
We cut out the paws with special scissors and turn them inside out using available means, namely a stick or pencil.
Tail
To make the tail, we need white fabric 9 cm by 9 cm, orange fabric 9 cm by 18 cm. We sew them together along the 9 cm side.
Fold in half and chop. Draw a round tip of the ponytail on the white fabric.
Sew the tail, making two lines for strength.
This toy pillow is also used to develop fine motor skills. Therefore, inside the paws and tail, in addition to the filler, we will place beads from old beads.
For each paw and tail you need 4-5 beads. Fill the tail and paws with filler.
Filled parts should not be too tight.
Ears
We will cut out the ears from orange squares 9 cm by 9 cm.
Fold them diagonally once.
Then the second one.
Then we make another turn, but not a complete one - see photo. This creates the shape of the auricle.
There is no need to iron the ears; we leave a voluminous shape.
Muzzle
For it, cut out an orange circle Ø20 cm (= Ø18 cm plus 2 cm allowance). You can immediately cut out the back part of a similar size, but from white fabric.
Just like we did for the body, we fold sandwiches for the cut out blanks. We pin them together with pins.
We quilt them in any way.
You get two finished circles.
Now we need to make a pattern for the pillowcases on cardboard. To do this, draw two circles Ø 55–60 mm with a slight overlap and cut them out.
Using the pattern, we cut out the backing from padding polyester or bulk adhesive non-woven fabric. We will also need white fabric large enough for the pillowcases.
Using a blank of non-woven fabric, we cut out pads from white fabric with allowances of 5 mm.
Iron the seam allowances inward, using the template as a rigid shape.
Cut a piece from the red tape for the tongue and place it on the muzzle.
We pin the ear pads and tongue with pins.
We sew the chin pads and tongue with a hidden seam by hand.
We cut out the eyes and pupils from white and black fabric, using 5 ruble coins for the template. and 1 rub.
First we fix the eyes onto the glue web. We attach them around the circumference with a zigzag stitch.
Then we attach the pupils and attach them. Sew on the button nose.
To make the ear pads almost natural, we sew small dots on them with black thread.
We attach the ears, making sure that they are placed symmetrically. We cut off the excess fabric.
Assembly
We attach the paws and tail to the body and attach them. We sew the tail especially carefully, using several lines.
We cut out a white belly 12 cm by 45 cm. We process it with an overlock on one long side on the body and belly.
We sew in a hidden zipper.
We get the connected parts.
We sew down the second long sides, obtaining a part in the form of a pipe.
We sew in the muzzle part and the back part. We make machine seams. At the same time, do not forget to unzip the zipper first.
Turn the pillow inside out.
Filling
We cut out a rectangular blank 44 cm by 57 cm and two round ones Ø20 cm from any fabric.
Sew the rectangle along a 44 cm side, leaving an open area in the center.
Fill the pillow with foam filler (or any other). Sew up the hole.
We insert the part into the body.
The pillow toy is ready!
Step-by-step photo of making a March cat
I will try not only to describe in words what we will do with my baby, but also to attach a photo so that the sequence of actions is clear.
- Paper;
- Pencil;
- Textile;
- Threads;
- Ribbon;
- Scissors;
- Needle;
- Chalk or soap for cutting;
- Felt pen.
And now about the work step by step.
- Draw each detail on paper and cut it out. What details do we need to draw: head, ears, paws, tail, body.
Cat pillow made from sweatpants
For sewing we will need:
- knitted pants, preferably plain;
- a piece of felt for the heart;
- scraps of faux fur or pink knitted fabric to decorate the muzzle;
- contrasting threads to decorate the muzzle;
- filler;
- threads, sewing tools.
Description
We decide on the size of the pillow and draw a pattern based on the photo.
We cut out two rectangular parts for the cat’s body.
Cut out four pieces for the ears from knitwear. For the inner part of the pink material, cut out two parts of the same shape as the ears, but smaller in size.
Sew the pink parts onto the blanks for the ears. We sew the ears by folding them in pairs. The seam is done by hand, using contrasting threads across the edge.
We cut out the heart and sew it in the center of the pillow with a simple basting stitch, using contrasting threads.
Cut out the nose and sew it on.
If desired, the cat’s paws can be made in one layer of material or in two. We cut out the required number of blanks and pin them onto the main part of the pillow.
Sew with a basting stitch using contrasting threads.
Fill the ears with filler and apply them to the upper edge of the pillow, controlling symmetry. We fix the position with pins or a basting stitch.
Place the top and bottom parts of the pillow right sides together and stitch around the perimeter, leaving room for stuffing.
Fill the pillow with filling. We sew up the open area by hand using hidden stitches.
How to sew a soft cat toy from fabric with your own hands - patterns
A master class on making soft mustachioed pets is suitable for experienced craftsmen and beginners. Children can do manual work together with adults; you just need to choose the right model of toy pets.
Kitty
The kids' favorite toy is a kitten. Detailed instructions for sewing a furry animal will help you deal with this task.
Required materials and tools:
- fleece or plush size 50*50 centimeters;
- holofiber or any other filler;
- eyes;
- fishing line 20 centimeters;
- scissors;
- needle.
- Print and cut out the template.
- Transfer the pattern to the fabric and cut, leaving allowances.
- Connect all parts of the toy as indicated in the photo (cat ears, tail).
- Fill with holofiber.
- Sew on the tail.
- Glue the eyes onto the muzzle.
- Sew in a mustache.
Travel pillow
You can sit comfortably on the bus while traveling by using an ergonomic cat pillow.
To make such a pillow you need to take:
- fabric of several shades of the same color scheme for the body;
- scraps of fabric or felt, threads for decorating the muzzle;
- filler;
- glue;
- threads and sewing tools.
How to sew a pillow
Making a pillow pattern. Approximate proportions can be seen in the photo below. The size of the internal diameter is determined depending on your own parameters.
We draw patterns for the eyes and mouth ourselves, in proportion to the size of the muzzle. We cut out the parts in the required quantity, allowing for seam allowances (except for the parts for the design of the muzzle).
Place the eyes on the muzzle detail and secure them with pins. Sew on with a zigzag stitch using contrasting threads. We pin the mouth and attach it with threads of the same color.
Glue the details of the pupils.
We chop off or sweep away parts of the upper part. We grind them on a machine.
We put together the parts of the legs and tail in pairs. We machine stitch them and turn them inside out.
Fill the paws and tail with filler. We compact it using available means - a pencil, knitting needles.
We fold the top and bottom parts with their right sides facing each other, having first inserted the legs and tail. We chop along the perimeter. We sew along the contour, leaving an open area for laying the filler.
Fill the pillow toy with filler. We sew up the open area by hand using hidden stitches.
All we have to do is embroider the cat’s mustache or make one out of strings.
Necessary tools for sewing cats
To sew a soft cat toy you will need the following parts:
- pile fabrics (needed for the base);
- scraps of fabric of various types and shades (needed for decoration);
- pieces of leather;
- colored yarn;
- multi-colored bobbin threads;
- sewing needles;
- scissors;
- chalk, pencil;
- checkered paper, tracing paper (needed for creating patterns);
- artificial fur;
- ribbons, lace;
- accessories (toy eyes, beads, beads, glass beads, buttons);
- padding material (cotton wool, padding polyester, padding polyester, pieces of fabric).
Important! There is no need to try to make a cat toy using all of these listed materials . Based on the idea and listening to your own feelings, it is better to choose one fabric and a couple of materials for decoration so that the product comes out beautiful and neat.
Cats, cats, kittens
Most Popular Most Discussed Best
Kitty for the mood A new pattern from Olga Zhuravleva specifically to cheer up on an autumn evening.
Kitty-3 We present to you a new work by Olga Zhuravleva - this is Kitty.
Slob This slob cat came to us today from Olga Zhuravleva. A cute nasty creature that we invite you to sew.
On its own, a Kitten from Olga Zhuravleva wandered into us, walking on its own. Cute tabby cat. Shall we sew?
Skoda Kitten We open the New Year with a Skoda Kitten pattern from the wonderful artist Olga Zhuravleva.
Pushen cat with a donut Look who came for the holidays - Pushen cat with a donut from Olga Zhuravleva. This pattern will help you sew a toy, a keychain or even a large sofa cushion, you just need to think about what you want most. Shall we begin?
Cats-1 There was a request on the forum for a pattern based on the picture. The original pattern was not found, so Tatyana Brazhenkova made her own version of the Kitty pattern with a funny pink belly button. Now you can sew such a wonderful couple.
Moon Cat It seems Summer is ending... Moon Cat came from Olga Zhuravleva.
TailCat The new cat from Olga Zhuravleva is not just a Cat, TailCat.
Striped 2 Spring!!! Probably the best time of the year is when... cats begin their arias. This striped miracle came from Olga Zhuravleva. Well, shall we sew? The cat from the film “Parrot Kesha” If you remember, in the cartoon this fat cat is red, but the author did not have red fabric, so in the author’s version this cat is an albino. But this does not prevent him from remaining just as cunning and funny. Krymchik the Cat New pattern from Oili - Krymchik the Cat - a soft fur-faux creation for yourself or for another loved one. A prerequisite is to sew with love, slowly! Love is... New cats from Olga Zhuravleva especially for Valentine's Day. This pattern can be the start of a small keychain for a loved one or a throw pillow for a loved one. It's up to you to decide, so after deciding, you need to either increase the pattern or reduce it to the desired parameters. Kotya-1 Kotya is a new pattern by Olga Zhuravleva. Easy to sew, great results! By the way, as Olga admitted, in her collection of patterns there are more than 20 cat patterns. Perhaps someday we will see the entire collection. Kitty-Purse The cat-purse is sewn from beige fleece, white velor and fur.
It is probably difficult to find someone who would remain indifferent to a toy made with their own hands. For a child, such a toy, sewn with soul, will always be the most valuable, but for an adult it will become a wonderful souvenir, radiating love, warmth and comfort. This section presents cat patterns. Many people are partial to these affectionate animals. The love of toys and the love of cats can be combined. We need a little free time and imagination.
Do you have a desire to create a toy, but you don’t know how to sew a cat? No problem. Our “Workshop” presents a huge number of patterns. You can sew a Lazy Cat, Kitty, Kisulya, Murka, Aunt Cat or another toy. Sizes, shapes, colors - it all depends on your imagination.
To sew a Cat toy, you will need fabric of any color; you can use plush, faux fur, knitwear, fleece or other fabric. Think in advance whether you will sew clothes and make accessories (hats, beads, etc.). Pay special attention to the face: the cat can smile, be angry, or be serious and thoughtful.
Some people like realistic animal toys, while others like to create fairy-tale or cartoon characters. Your cat will be just the way you like it!
Or maybe we can sew a kitten or a cat?
Or maybe you are interested in a cat pattern? Kitties, of course, are very cute creatures, but cats. They can be fatties, long-legged tomboys, furry babies.
You might want to sew with your own hands, using a pattern, a cat from the cartoon “Kesh the Parrot,” a moon cat, a Striped Cat, a Murzik, or another toy. Use your imagination, and a famous character in your hands will become completely different.
You don’t have to sew a big cat, you can sew a kitten. Multi-colored, striped, fluffy - they are simply pleasing to the eye.
Many needlewomen are interested in patterns of tilde cats. Toys in pastel colors, made from natural fabrics, look great in the interior. Often cats are sewn for couples. They can be connected or be independent toys.