Cats are the favorite pets of most of the country's population. When getting them, you should prepare in advance for a lot of unpleasant surprises due to the incredible activity and curiosity of these animals. So that coexistence with them within the living space is not overshadowed, you need to prepare a decent place for them to relax and play.
The ideal solution is a cat house with a scratching post - it will easily become a favorite place to sleep and an excellent exercise machine for your tailed friend.
Moreover, it is not at all necessary to go to the store for such a design - you can easily make it yourself. And in most cases, a design made with one’s own hands turns out to be much more practical, attractive and functional than a purchased one.
With or without claws?
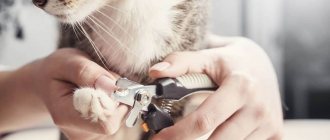
Is it possible to do something with the cat to prevent it from scratching? Veterinarians know 8 or 9 ways to deprive her of this opportunity. But after the most “humane” of them, the animal will feel like a child playing with tightly bandaged hands or walking in a straitjacket. Impacts of “moderate severity” will cause sensations in the animal approximately the same as filling a carious tooth without painkillers in a person, and they will have to be used regularly: cat’s claws are constantly growing. And “radical” methods generally smack of fanaticism and leave the animal disabled.
Health is most important
Long claws cause inconvenience when walking, and after some time the cats begin to limp.
There are cases when the plate gets wrapped up and grows into the pad. This is already a serious injury that causes an inflammatory process. During a jump, when the cat cannot land correctly due to interfering claws, a sprain or even rupture of the ligaments may occur. Don't let this happen!
Step by step instructions 4
Attach the foam to the inside walls of the large box using tape.
Insert a small box like a nesting doll.
Place non-synthetic rags at the bottom. Do not use wool, as it strongly absorbs moisture. The best option is a fleece blanket.
Wrap the house in thick, waterproof film. Tape all seams with wide tape to avoid drafts.
In the corner of the structure, cut a 15x15 cm exit. As you know, a cat crawls through a hole if its head passes through. A small hole is necessary to retain heat. Secure the edges of the hole with tape.
Make a foundation of bricks or boards - the house needs to rise above the ground for additional insulation from cold and water.
How to make two-story cat houses from boxes
What do you need
- Several cardboard boxes;
- scissors;
- stationery pin;
- pencil;
- ruler;
- stationery knife;
- glue gun;
- thin plastic;
- a pillow or basket with something soft.
How to do
1. Cut a narrow strip of cardboard and pierce it on the side with a pin. Insert a pencil there, place it on the cardboard and, holding the part at one end, scroll it in a circle.
YouTube channel EverXFun
2. Draw a long straight line under the circle to the right. Draw another horizontal line from the middle of the circle in the same direction. Connect them with one vertical one.
Cut out the shape with a utility knife. Prepare another figure in the same way.
YouTube channel EverXFun
3. Cut out several rectangular windows in a large piece of cardboard. Using a glue gun, attach this part to one circle.
YouTube channel EverXFun
4. Cut a piece of cardboard: the height should match the height of the structure made, and the width should match the length of the rectangular piece in the front of the base. Cut out a door and a window with a frame in a piece. Attach the element to the front of the house.
YouTube channel EverXFun
5. Cover the back wall with a solid piece of cardboard, and the narrow side wall with cardboard with a window cut out in it.
YouTube channel EverXFun
6. Cut the circle from the other piece from step two. Glue it horizontally into the round piece, just below the top edge. Attach the other cut part above the walls with the door and windows.
YouTube channel EverXFun
7. Cut out several of the shapes shown in the photo. Glue them together to make the parts thicker.
YouTube channel EverXFun
8. Glue the small pieces vertically to the hole plate. Attach the second piece on the other side. This will be a staircase.
YouTube channel EverXFun
9. Make sideboards on the second floor, as shown in the photo and video.
YouTube channel EverXFun
10. Glue the cardboard on top in the middle so that a tunnel is formed.
YouTube channel EverXFun
11. Glue the ladder to the side, above the window. Use thin strips of cardboard to cover the seams on the railing.
Attach the visor to the seam above the door at an angle. Glue thin plastic into the round part from the inside, “glazing” the windows. Place a pillow or basket with something soft on the top circle.
YouTube channel EverXFun
12. If desired, decorate the house, add soft fabric inside and hang a bell above the door.
YouTube channel EverXFun
What other options are there?
Here is another house with two staircases:
And this cat was given a home with a personal hammock:
Project planning: diagram, dimensions
To make a scratching post, you need to first develop a design project, prepare the necessary tools and purchase the necessary building materials.
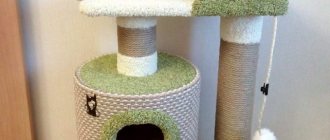
A practical and safe design option would be to place five platforms for crawling and jumping on three support posts, a rectangular house, a hammock and a small platform on top of a long post. If there are several pets in the house, then it is advisable not to distribute the platforms evenly, since one cat, jumping on the platforms as if on a ladder, will not allow the other cat to sleep if he decides to do so on one of the shelves.
Thus, on one base there will be three thick pillars connected to each other by the first platform. The second platform will connect the longest and shortest pillars, and the third will be placed under the rectangular box (house) and connect the main pillar with the middle one. Next will be the house itself, above which on the main (longest) pillar there will be two platforms of different sizes.
Game complex - step-by-step instructions
It’s easy to make a cat house with your own hands from scrap materials. Here you will need a little skill and a little skill. If you are not a master at working with a hammer and nails, you can use simple methods to erect a structure.
Cardboard house
The play complex for cats is especially popular among ordinary people and cat breeders, as well as pet store sellers, because this is where you can find all the variety of housing for animals. Take this opportunity and carefully consider such designs, so that you can then create your own version of the “living space”.
Play complex made of sawn wood
As a rule, the presented type of complexes has a high cost, however, the cost itself does not exceed several hundred rubles. Sometimes the necessary materials are available.
Necessary materials
So, to build this kind of structure you will need the following materials:
- plywood no more than 10 mm thick;
- polyethylene pipe with a diameter of up to 12 cm;
- furniture metal corners in the amount of 15-25 pieces;
- any natural rope, you can take hemp or jute;
- liquid glue without a strong odor;
- any material your pet likes (you can find out by his favorite place to sleep) for lining the house;
- tools for work.
Master class on making a cat house with your own hands:
- Cut 6 squares from plywood in accordance with the dimensions of the future seating area. Make round holes in two of them - the main entrance and the back door.
- Connect the walls of the home together into a kind of cube using furniture corners. Before attaching the part with the main entrance hole, upholster the inside of the house with material. A layer of foam rubber should also be placed under the material. Attach "entrance".
- Use a pipe to create an observation deck. You can first coat it with glue, and then tightly wrap the rope around it.
- Cut a square or rectangle according to your pet's size to create a viewing platform. Cover it also with material, having previously placed foam rubber.
- Attach the viewing platform using corners to the pipe.
- The pipe is attached to the roof of the manufactured house, which can also be previously covered with material from the outside, but without foam rubber.
This house model is the simplest and is used as a basic option. Of course, the owner can improve the housing for his pet in accordance with his preferences. Sometimes an additional play pendant is attached at the bottom of the viewing platform.
This combination option is possible, but only if the entire structure is fixed to the floor, because an unstable house can be turned over during play, which will lead to injuries to the four-legged pet. Think through everything carefully and with the possibility of possible unpleasant incidents.
WHAT TOOLS AND MATERIALS WILL WE NEED?
To make your own personal apartment for your four-legged friend, you will need very few materials and tools. Moreover, you can easily find most of it in a storage room, garage or shed: as a rule, you will only have to buy elements of the external finishing of the structure in the store. Before starting work, you will need the following tools and consumables:
- tape measure and long ruler;
- pencil (you can take either a simple or a construction pencil);
- jigsaw (it’s faster and more accurate to use a jigsaw; in extreme cases, a manual one will do);
- screwdriver, electric drill, set of drills and bits for them;
- drawing compass;
- construction stapler with staples;
- hammer;
- hot glue gun;
- a sharp knife (can be a stationery or construction knife), scissors;
- if the assembly will be carried out in a house (apartment), then it is worth preparing a household vacuum cleaner;
- stool or workbench for assembly.
Directly for the construction of cat apartments we will need:
- plywood or chipboard, OSB boards 9–12 mm thick. I used an old countertop;
- timber for making support pillars. Some advise using metal or plastic pipes instead of timber, but with them the structure is not as strong and durable;
- fabric for upholstery of beds and cat houses. Carpet is optimally suited for this purpose;
- a set of screws of various thicknesses and diameters for wood;
- furniture corners for reliable fixation of all structural elements and arrangement of the hammock;
- jute or hemp rope with a diameter of about 1 cm.
As you can see, most of the tools are usually always at the disposal of the home owner. The missing materials for assembling the base of the structure can easily be found by rummaging around in the garage and storage room. And it won’t take much money to purchase everything you need - at least many times less than the cost of a ready-made cat house.
Device
Cat on a bed
To tear through the cat’s claws, at worst, a simple post or board will suffice, pos. 1 in Fig. However, it is better to complement it with a bed, pos. 2. Firstly, in nature, cat markers are not equivalent. One of them, with an elevated bench for relaxation and an observation deck above it, is the main one, the capital, so to speak. It is not necessarily in the center, it can be on the periphery. The cat's territory in the home is limited. You can do without boundary (contour) markers, but the main one will give the cat dignity, which, in turn, can well decorate the interior, see fig. on right.
Scratching posts for cats with a bed
But to combine a scratching post with a house, and even installed below, as in pos. 3, should not. In natural conditions, the cat's den is never combined with the main marker, for safety reasons. Some exceptions are cats of Asian origin: Siamese, Bengal, Abyssinian, etc., the territory of whose ancestors in the jungle is limited to an area of just one tree. But then the house must be elevated and equipped with 2 exits: a spare one perpendicular to the main one and opens onto an additional platform, pos. 4.
It is best if the scratching post with a bed and viewing platform is not a straight column, but a branched one, somewhat reminiscent of a tree, pos. 5. This can be built from cardboard pipes, see below. And on to the next. rice. – drawings of scratching posts with a climbing frame and platforms: on the left for energetic and jumping cats, and on the right for phlegmatic and sedate cats.
Drawings of scratching posts with beds and climbing frames
About the sites
Houses, toys, climbing frames and beds for cats are actually a different topic. In relation to scratching posts with platforms, it would be appropriate to say that the bed and the “observatory” do not need to be covered: cats have soft fur of their own. If you want to visually ennoble the product, then you don’t need to fasten the fabric like furniture, with nails or staples: metal can tear off a claw if it gets caught, and it conducts electricity too well for cats.
Cat areas are lined with PVA glue: when dried, it is odorless and is harmless and indifferent to cats. Step-by-step instructions for covering a cat bed with fabric are as follows:
- We cut with an allowance for the edge thickness plus 25-30 mm;
- We cut out the base (plywood or board 16 mm thick) with rounded corners so that the folds on them are small or can be completely dispersed;
- Apply glue to the upper part in rays and along the contour, see fig. on right. It is better to do this with a brush to immediately disperse the glue in a thin layer;
- Immediately, before the glue begins to set, we apply the fabric;
- We coat the edge with glue and, together with it, under the platform along the contour by 35-40 mm;
- We fold the fabric over the edge and tuck it under;
- From the bottom we pull the tight-fitting thread with a needle, zigzag along and across;
- Straighten the folds at the corners;
- We dry it for a day, there is no need to apply pressure;
- We cut off the excess fabric at the bottom along with the threads;
- Instead of overcasting, we impregnate the fold of the fabric on the underside with the same PVA, diluted by half with water.
Where to put the house?
The apartment for the cat needs to be prepared
It is important to provide the animal with a certain place for sharpening its claws and warming up. Every animal wants to have a shelter that provides the opportunity to hide
If you do not provide your pet with the opportunity to relieve stress and discharge energy, he may become aggressive and become depressed.
Cats are sensitive to personal space, leave marks along the way they move, and look for smell. Cats love to watch what is happening around them. The house should be installed so that the animal feels safe, while at the same time watching what is happening in the room, outside the window.
It is important for every cat to have its own claw trainer. Cats don't like to share space with each other
Forcing cats to fight over an attractive toy can cause them to lose interest in the scratching post.
Stages of work
The corners of the shelves and stands are cut out using a stencil. Then the base of the structure is assembled from pillars, stands and shelves. After checking the compatibility of all parts, all shelves are covered with carpet.
Using a level, markings are made so that the shelves are parallel. Corners are mounted on the pillars, then shelves are attached to them. Next, the entire product is assembled and tested for strength.
At the next stage, a house is constructed from pieces of plywood. Two walls, a floor and a roof are connected. The fourth wall is a sheet with a sawn-out entrance. The inside and outside of the cat house is finished with carpet.
Corners are mounted to the posts and bottom of the house. The pillars are wrapped with jute cord and periodically secured with a stapler.
A DIY cat scratching post as part of a play complex is ready. For greater stability, the finished product should be secured near the wall.
House
Try to take the words “cat house” literally and make separate apartments for your pet. It could be a minimalist plywood house, stylized as a country house, or a luxurious mansion - an exact copy of some castle. Huge scope for imagination!
The advantage of such “apartments” is their aesthetic appearance. The house can be decorated with various decorative elements, such as flowers in pots. Remember: the items chosen for the design must be safe for the pet.
Photo: picclick.com
House "Zoogurman Empire" for dogs and cats
RUB 1,550
Buy
Photo of DIY scratching posts
Step-by-step instructions for making your own floor scratching posts with photo examples
If a simple option does not seem attractive, and your hands are eager to create something more interesting, then we will consider more original options.
Master class on making a flat scratching post for a cat with your own hands
We suggest making an excellent nail polisher: in 3 hours the cat will be able to give herself a manicure.
| Illustration | Description of action |
| We take pressed cardboard and cut off equal, narrow strips with a stationery knife. | |
| We will glue the strips with PVA glue. We smear the plane of each strip. We place the strips between two books or boxes for alignment. | |
| After 2 hours everything stuck together, the glue dried. We tape everything around the perimeter with tape. | |
| We watch how the cat uses a new object. |
How to make a scratching post for a cat with your own hands
It's time to find out how to make your own cat scratching post in the form of a column.
| Illustration | Description of action |
| Prepare two sheets of chipboard (can be from old furniture), a sewer pipe with a diameter of 100 mm. Its height is approximately 60-70 cm. | |
| Using a homemade compass or an ordinary one, draw identical circles on the chipboard. The smaller circle in diameter will be the base, and the larger one will be the bed on top of the column. | |
| They cut out circles with a jigsaw and try on how the product will look. | |
| The pipe is secured with furniture corners, three corners per circumference. The post is wrapped with rope and glued at the base and top. If desired, the base and the lounger are decorated using fabric and a furniture stapler. Under the fabric of the lounger you will need synthetic padding or foam rubber. |
Making your own cat house with a scratching post
The most complex design: prepare a sheet of plywood, sheets of chipboard or MDF, several PVC pipes with a diameter of 100 mm, self-tapping screws, a screwdriver, a jigsaw, and any compass of suitable size. So, how to make a scratching post for a cat with a play complex, we work with our own hands. The photo shows the work process.
| Illustration | Description of action |
| On a sheet of chipboard, draw two circles taking into account the size of your pet. Cut them out. | |
| To assemble the house, you will need to cut the plywood correctly - perpendicular to the grain so that it can curl. Cut a wide strip, keeping in mind that the cat should not be too cramped inside the house. | |
| We assemble a house from circles and strips of plywood with a pre-cut hole | |
| You need to attach 4 PVC pipes to a rectangular chipboard sheet. To do this, you can put a small wooden plug to fit the size of the pipe inside the base of the pipes. Now the pipes are screwed with self-tapping screws at the corners of the board. This is where the permanent fixation ends. Next, the remaining elements are prepared and assembled into a game complex in order to see what will happen in the end. After this, we disassemble almost the entire structure and engage in decorative finishing of each element. This will be followed by final assembly with fixation. | |
| In the future shelf, holes for pipes are cut out in the corners with jigsaws. The shelf is placed at some distance from the floor. We build up the third tier using the same method, but we take a different shape of the chipboard sheet - you can cut off a corner. The 4th floor is located nearby. Between them the house will be fixed to a PVC pipe on the base of the third tier. | |
| Fastenings are made using furniture corners. | |
| At the end of the assembly, we launch the pet into the complex and admire the work done. |
Diagrams and dimensions for making your own scratching post for a cat with a bed
To make it easier to assemble a scratching post with a bed yourself, we offer a number of diagrams that may be useful.
The height is chosen arbitrarily. If the cat likes to climb higher, then there is no point in making a bed at the level of your knees.
Multi-tiered structures are not easy to make, but what can’t you do for your beloved cat?
It makes sense to install a sun lounger or a house on top - from below, the kitty may be happy with the new comfortable “urinal”, which is not such in your eyes
The scale should be comfortable for the cat. If a Maine Coon will jump on the shelves, then a solid size structure is required
Imagination and diligence are the key to cat happiness!
We live out of suitcases
Of course, this formulation does not sound very good, but as far as building a house for a cat is concerned, it is quite possible.
Moreover, if you do a little tinkering, you can place not one, but even two cats here. In its structure, such a design will resemble a children's bunk bed.
To create it, you need to divide an old suitcase into two halves and insert supports between them (their role can easily be played by the legs from an old stool). Next, we set up a warm bed. Voila, the “apartments” are ready!
Photo: hillspet.ru
Photo: magnat-home.ru
Possible types for needlework
There are many varieties of such useful claw tools. They differ from each other in the type of installation. The choice of owners should depend on the “bad” habits of their pet.
Wall structures
This scratching post is a flat board that is attached to the wall. Usually it is covered with jute or sisal. This option is optimal for those owners whose “criminals” have made wallpaper in one specific place or several at once a constant target.
There is another original subtype of wall-mounted flat scratching post - a corner one. It can be installed on internal or external wall joints. Due to the two planes located together, its size can be reduced, which allows you to get a complete essential item for even the smallest apartments.
Both a simple flat structure and a corner scratching post are often made multi-story - with several platforms or hammocks that serve as a resting place and also as an observation post. This creation will appeal to pets who love to keep a watchful eye on what is happening from cabinets, the backs of upholstered furniture or tables.
This product has advantages over other types. In this list:
- minimum space occupied by it;
- the ability to install where it is most convenient;
- no risk of the scratching post falling, which can be very frightening, especially at night;
- a good chance at first to do without wall repairs, since this scratching post will hide from view those areas of wallpaper that have turned into unsightly rags;
- low costs for self-production.
There is a downside - it is rigidly attached to the wall, which will create difficulties if you have to move the cat's household item to another place. But this disadvantage is not such if the cat has a permanent place for procedures and does not want changes.
Floor scratching posts
This option is suitable for those apartments where horizontal surfaces are subject to torture, and the walls are intact. In this case, it is better for owners to prefer one of the following varieties.
- Flat. This is the simplest claw board - a board with a simple flat or inclined surface. As a rule, it is wrapped in sisal. Such designs are compact, lightweight, and therefore convenient because they can be moved or transported to any place.
- Having curves. Wave-shaped scratching posts will help cats combine business with pleasure, because with such a model you can not only sharpen your claws, but also play around. These products will require more space in the room, and they are also somewhat more difficult to manufacture.
- Cardboard. This “home savior” is the most impractical, as it is made from cardboard blanks that are glued together. The disadvantages are the fragility of the product and torn pieces of cardboard, which will have to be picked up constantly.
Platforms with pillars
These scratching posts are the most popular cat products. The main thing when choosing a model is the height of the column that is suitable for the animal. Half a meter is enough for small creatures; an adult cat needs 70 or more centimeters. Platforms with “columns” are divided according to the degree of functionality, and therefore the complexity of manufacturing.
- A column with a platform. The simplest option, compact and economical. Such store-bought scratching posts are covered with jute, which is not particularly durable.
- Angular. They also won’t take up much space, but will protect the corners if your pet has a bad habit of tormenting them.
- Sites with a column and a house. These are more serious structures that allow the pet to settle on them for a long time, if not forever.
- Multi-level complexes. They include several pillars, between which hammocks are stretched, there are tunnels, ladders, and rest areas. This is the most labor-intensive option if the operation “Do-it-yourself scratching post using improvised means” is planned. It's not suitable for a debut.
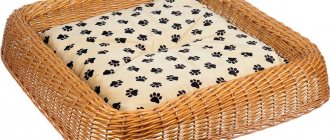
Soft bed
Does your pet like to sleep on your pillow and other soft objects? Then he will definitely like the soft bed. These beds come in different colors and shapes, so you are sure to find an option that will not only please your pet, but will also suit the interior of the room.
Photo: ebay.it
Curver Pet Bed with Knitted Comfort Pillow
RUB 7,994
Buy
The most popular homemade scratching posts (manufacturing instructions)
Any owner can make a scratching post for their pet themselves. First you need to choose the desired type of product and stock up on the appropriate materials.
Corrugated cardboard scratching post
This type is the most economical and environmentally friendly; its production does not require much time.
One of the bloggers, Andrey Deveykin, made a scratching post in this form. Thanks to him for providing the photographs.
Manufacturing:
lay out cardboard boxes, draw strips about 10-15 cm wide on them;
cut out the resulting strips and start rolling them. The very first strip is the base of the structure. It needs to be rolled up as tightly as possible and secured with PVA or adhesive tape;
gradually increase the volume by gluing strips and fixing them with tape or PVA;
the last strip must be secured especially carefully so that it holds the entire structure and does not allow it to fall apart after the cat’s first attempt to sharpen its claws;
The resulting scratching post must be placed on thick paper, circled around the edges and cut along the line. Glue the resulting paper figure to the bottom of the structure.
Corner scratching post
To make a corner model, you will need boards the width of a door frame. A thick fabric is attached over the boards or a thick rope made of natural materials is wound. When the product is ready, it is fastened on both sides of the outer corner.
Here is an example of step-by-step manufacturing of a corner scratching post:
Take a board 200 mm wide and 1.2 meters long.
Saw it in half.
The result is two identical boards that need to be connected using dowels. It is better not to use self-tapping screws (since the cat, when sharpening its claws, may get into their cap). By the way, we must remember to process the cut edges so that our cat does not harm himself.
Connect two pieces and make marks every 8 cm; there will be dowels in these places.
We take dowels with a diameter of 6 mm and a length of 30 mm. Accordingly, in one of the workpieces you need to drill holes 15 mm deep (with a 6 mm drill) from the end in the marked places.
You need to hammer the dowels into the resulting holes to equal lengths; you can use a square for this.
In another workpiece, holes must be drilled from the front side.
Next, fasten the workpieces using glue and wait until it dries.
For upholstery, you can use carpet, first dividing it into two equal parts.
You can secure the carpet using a stapler on the inside of the scratching post. The remaining part needs to be covered with glue and glued to the boards. And also attach the second end of the carpet using a stapler.
You can attach the scratching post to the wall using the corners (bottom and top). You need to drill holes in the wall where the corners are attached, and then hang the scratching post using self-tapping screws.
Afterwards, do not forget to check that the scratching post is holding well by hanging the cat on it).
Wall-mounted scratching post
The principle of its manufacture is the same as the corner version, but for the work one takes one wide board and attaches it to the wall so that the cat can easily reach it by standing up to its full height
It is important that the cat has free access to the scratching post. It is better not to place it in the bathroom or hallway
You need to determine where your pet spends the most time and place the device there.
Scratching post-post
For work you will need: a beam approximately 70 cm long and at least 5 cm wide, a round or square support made of wood about 4 cm thick.
Instructions for assembling the scratching post:
- On the support of the future claw handle, draw one line in the middle and a second line perpendicular to it, connecting them in the center. At the intersection point we will later attach the stand. We place the prepared beam in the middle of the support, then we outline its boundaries for further placement of self-tapping screws or self-tapping screws.
- We connect the support to the beam using glue and fasten them with self-tapping screws.
- We either leave the block in its original form or cover it with fabric, cutting out a piece with a width equal to the diameter of the stand, adding a couple of centimeters for the seams.
- We tightly wrap a thick rope over the fabric, tying it in a tight knot at the bottom of the block. By the way, the rope can be painted in several places, then the scratching post will look much more beautiful. The rope can be put on glue if it does not hold well.
Floor scratching post
This model is convenient because it does not take up much space in the apartment, it can be rearranged and taken with you on the road. The most simple version of a floor scratching post is an ordinary board covered with carpet. You can also wrap a thick twine around the base.
When making such a nail polisher, the main condition is the weight and stability of the device so that it does not drag on the floor when the cat decides to sharpen its claws.