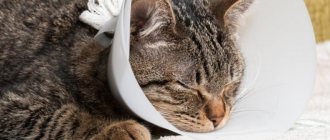
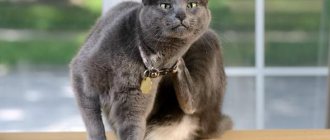
If it so happens that your pet has undergone surgery and has begun post-operative recovery, or you have to treat it for some kind of infection, then think about the precautions of preventing the cat from accessing the wound or infected area using a cat collar. Why resort to them?
At the genetic level, cats are programmed to lick injured areas of the body. Their saliva contains substances that promote wound healing. This quality helps animals not die in the wild. But, in addition to useful substances, cat saliva contains harmful microorganisms that do not heal, but cripple.
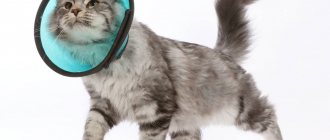
The main purpose of the Elizabethan collar is to prevent the pet from interfering with its speedy recovery.
When to use a collar
A therapy cap is used to prevent a kitten or adult cat from reaching certain parts of the body with their tongue (teeth). This is necessary in the following situations:
- rehabilitation after undergoing castration;
- postoperative period;
- antiparasitic disinfection of wool using chemicals;
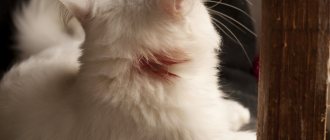
- treatment of allergic skin rashes accompanied by unbearable itching.
This collar is also worn when trimming the nails of particularly aggressive representatives, or when bathing a pet (to prevent water from getting into the ears).
Thanks to this protection, sutures after any surgical intervention and wounds as a result of dermatitis heal faster, without causing any complications. And medications applied to the skin are absorbed better. Thanks to the veterinary collar, the risk of infection getting inside and poisoning the animal is minimized.
Sock blankets
This method is almost completely similar to that described above. To make a headband, you need to find a sock of the right size and cut off the front part of it so that you can put it on the animal’s body.
This blanket has the following advantages:
- large selection of socks sizes;
- low cost;
- high fabric strength;
- no bandages.
Among the disadvantages are:
- since there are no methods of fastening, the cat often removes such a bandage;
- Cheap socks are made from low-quality raw materials, so they tend to shed quickly, which can cause wound infection.
Thus, this method of swaddling animals that have undergone sterilization surgery cannot be called the best. Its only advantage is the low cost of the socks.
What to look for when choosing
The effectiveness of a protective collar depends primarily on the correctly selected model. To avoid mistakes, follow basic expert advice:
- The height of the cone should be such that the cat is both comfortable and safe. Don’t take one that’s too high, but a short one isn’t an option either. In the first case, the cat will not have lateral vision, in the second, it will easily reach painful areas.
- It's not worth saving. In the production of budget models, harmful materials with a specific odor are often used.
- The tapered part of the collar adjacent to the neck should not be extremely elastic. There must be free space between the bandage and the animal's neck so that the finger can easily pass through. Close contact with the skin is fraught with the occurrence of an allergic reaction and breathing problems, and weak contact can lead to quick removal of the cap.
- The prickly protrusions of the structure must be sealed with tape so that the animal does not get injured.
- It is not advisable to buy products that are too large and heavy, even if they are visually attractive. Such structures complicate movement and prevent free vision.
It is important that the pet is not able to rip off the collar or break it.
Some funny cats
Some animals behave aggressively during hygiene procedures. By putting a protective item on a cat, the owner will protect himself from its bites and claws.
Size chart of protective collars for cats - table
Ready-made barrier collar structures for animals are convenient because it is possible to choose the right size. To do this, first measure the diameter of your pet's neck. Then refer to the table:
| Neck circumference, cm | Product height, cm | Marking |
| 15-17 | 8 | 1 |
| 20-24 | 10,5 | 2 |
| 22-25 | 7/10 | 7/10 |
| 28-33 | 12 | 12 |
| 27-31 | 12 | 3 |
| 31-38 | 15 | 15 |
| 30-34 | 14 | 4 |
| 38-44 | 20 | 20 |
Blanket from old children's clothes
If you still have unnecessary blouses or vests, then they are perfect for sewing a bandage for a cat. The main thing is to choose things that will fit well on the animal’s body without causing it any particular inconvenience. First, you will need to take measurements from your pet, and then sew a blanket using them on a sewing machine. And you also need to think about how it will be attached. To do this, you can provide ties, buttons or Velcro. This option has absolutely no disadvantages, but only one advantage, which is that you do not have to spend money on purchasing materials.
Wearing rules and instructions for use
It’s not enough to put a collar on your cat; you also need to give it time to get used to the new accessory. At first, it is removed during feeding. During the period of injection therapy, the attribute is worn so that the clasp does not come into contact with the injection marks. From time to time it is necessary to give the “sick” a break - remove the protective collar for a short time, but make sure that the cat does not begin to lick itself at this time and do other forbidden manipulations.
It is advisable to have the protective collar put on by a specialist.
How to wear
If the veterinary clinic did not put on a collar, you will have to deal with it yourself. The main thing is to make sure that the E-collar is the right size - it will not squeeze or dangle freely. Therefore, first measure the circumference of the animal’s neck and compare it with the size of the accessory.
Before putting it on, calm your cat down with petting and gentle words. If she suddenly gets nervous, put off the attempt for a while - you can’t force her. It’s more convenient if someone helps you - hold you while you put on the collar.
Be sure to check from time to time that the cone is seated correctly. The pet may try to get rid of it and move it with its paw, which will cause discomfort to it.
How to put on a collar correctly
How much to wear
The recovery period after surgery or illness usually lasts no more than 1-2 weeks. This is provided that the cat does not touch the stitches and wounds. You should not allow the animal to lick them, which will delay the healing process.
Therefore, you need to wear a barrier collar for a different time in each case. This depends on a number of factors: the age of the animal, the characteristics of the body, the speed of recovery. The cap is removed only when the veterinarian allows it.
If the cat doesn’t get used to it and removes protection
There is no need to despair if your pet constantly tries to remove the collar. Adaptation takes some time - usually several days. If the rejection period is too long, make sure that no mistake was made on your part:
- the wrong size of the collar, which makes it easier to remove;
- the presence of prickly edges;
- lack of attention to the pet from the owner;
- incorrectly selected material that causes irritation to the pet (it rustles loudly, does not allow you to see what is happening around, etc.).
Find out the essence of the problem and try to solve it, then the cat will quickly get used to such equipment.
Homemade blanket at home
It is not at all necessary to buy a bandage for your cat after sterilization. You can make it with your own hands from various available materials. At the same time, you may not even have cutting and sewing skills.
Next, we will look at the most common options that will allow you to make a good bandage. And so that it does not become contaminated with ichor and always remains clean, you can put a regular sanitary pad, which will absorb all the secretions. However, in order to prevent the spread of pathogenic microflora, they should be changed every day.
In addition, it is recommended to periodically do air baths so that the wound can breathe. This contributes to a speedy recovery of the animal and its return to a normal lifestyle.
How to make such a product yourself
You can buy a rehabilitation bandage for your pet at a pet store, but commercially available models do not always fit the required parameters. Therefore, they often get out of the situation by making such a structure themselves. It’s not difficult to make, since you can use any available material and find patterns on the Internet.
Collar made of plastic
The lightweight plastic construction is no less reliable than a store-bought one. The work will require the following:
- an ordinary stationery folder or a bendable cutting board;
- tape (wide adhesive tape);
- stapler;
- soft fastener or Velcro.
Sequencing:
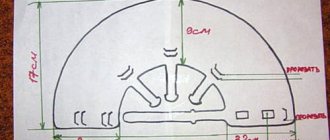
- A pattern is made on an A4 sheet. To do this, you need to take two measurements: neck circumference and the distance from the nose to the shoulder area. On paper, two circles are drawn with a compass: a large one and a smaller one (the indent between them is equal to the value of measurement No. 2, and the diameter in the center is measurement No. 1). Do not forget to leave an extra allowance of up to 3 cm at the edges.
- Using the finished paper pattern, a cone is cut out from the original material.
- Try the resulting blank on the animal. Excess fabric is cut off.
- The pointed edges are covered with tape.
- Fix the fasteners along one edge of the product using a stapler.
- Place the collar on the pet and fasten it.
Blank
Video instructions for production:
An alternative option could be a bottle made from a plastic bottle (usually a two-liter bottle is suitable).
Step by step process:
- In the upper part of the bottle, find a place corresponding to the size of the animal’s neck circumference and outline it with a marker.
- The required height of the bandage is measured from the marked line. The excess is cut off.
- Make one incision vertically. On each side, along the edges, cuts are made for threading the cord (it will serve as a clasp).
- All sharp edges are treated with a lighter (they will melt and will not be able to injure the cat).
- Thread a string through the holes.
- Try on the finished accessory on the pet.
A plastic bottle collar is the most budget option
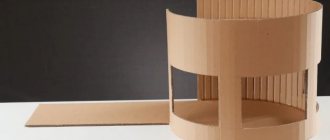
Cardboard collar
In this case, you will need thicker cardboard. And the rest of the materials and tools will be the same as in the previous example.
A protective collar can be made from cardboard in a few minutes.
Sequence of steps:
- Using the pattern (it is the same as when making a plastic collar), a blank is cut out of cardboard paper.
- Roll into a funnel shape.
- The loop fasteners can be cut separately and glued to one side of the cone. Another option is to make holes for lacing with an awl or attach Velcro.
- Put the accessory on the cat and fix it in the way that was chosen. If there are no fasteners, then fasten the edges of the gate with tape or a stapler.
Video:
Fabric collar
The fabric collar does not put pressure on the animal’s neck
A textile neck bandage is considered the most comfortable for an animal. There is no particular strain when wearing it. Also, it does not cause any unpleasant sensations to the animal. It is sewn from natural fabric (linen, cotton).
The manufacturing process takes a minimum of time. It is enough to draw a pattern on the material and cut out the details. They are then sewn together.
Cutting the blank according to the pattern
Alternative manufacturing options
There are other interpretations of homemade windbreakers for the rehabilitation of pets. For example, you can use foam rubber. A ring is cut out of the sheet, no more than 2 cm thick and about 30 cm in diameter.
Beauty and benefit at the same time
Another alternative solution is to use a plastic plate. A hole is cut in the center corresponding to the diameter of the cat’s neck with an increase of one centimeter. The inside of the workpiece is covered with soft cloth. Place the product on the “patient” and fasten the edges with tape or another effective method.
A bandage made from a disposable plate is not a solution
It is important to understand that homemade collar models will not last long. Therefore, if possible, it is necessary to purchase a ready-made one in a store if long-term rehabilitation is expected.
Ready-made models
Plastic
The bulk of the products are made of transparent and translucent plastic. These are lightweight, comfortable accessories that do not interfere with the cat’s view and are easy to care for.
- Protective collar for cats with collar (TOSHKA and KO);
- Talismed Collar;
- Avita group.
Protective collar with collar (TOSHKA and KO)
- Plus: the sharp edge of the product is finished with a fabric edging.
- Minus: you need to select the size.
Prices depend on size: from 190 to 995 rubles.
Collar Talismed
The protective cone for cats is made of high-quality plastic and is attached to the collar using three fasteners. A latch-tongue is used for fixation and adjustment. Available in several sizes.
- Pro: Suitable for dogs.
- Cons: sharp edges.
Price: from 101 to 324 rubles.
Avita-group
- Plus: no sharp edges.
- Cons: Requires sizing.
Price: from 95 to 150 rubles.
Soft
- Freddy's Friends Brand Pillow Collar;
- Medical collar OSSO;
- Kruuse Buster Soft Collar;
- Disposable post-operative collar Kruuse Buster.
Freddy's Friends Brand Pillow Collar
- Plus: good review.
- Cons: high price.
Price: from 850 to 1150 rubles.
Medical collar OSSO
The model is made of durable Oxford fabric - a cat will not be able to tear it. To secure it on the animal's neck, the collar is equipped with a Velcro collar. The cat experiences less discomfort when wearing it, thanks to the small dimensions of the product and its flexibility.
- Plus: does not affect the animal’s thermoregulation.
- Cons: bad review.
Price: from 190 to 455 rubles.
Kruuse Buster Soft Collar
This simple fabric model is made in the shape of a four-section cone. The fabric is water-repellent. The edges of the product are finished with piping. Fixation is carried out using lace and loops.
- Plus: has good flexibility.
- Cons: bad review.
I recommend: How to measure a cat correctly
Price: from 120 to 200 rubles.
Disposable post-operative collar Kruuse Buster
The collar is intended for one-time use after surgery. Made from non-woven waterproof material. The non-rigid design makes it easier for the pet to see and does not interfere with daily functions. Fixed around the neck with a drawstring.
- Plus: it doesn't rub your neck.
- Cons: disposable.
Price: from 150 to 170 rubles.
Veterinarian advice
The use of a postoperative bandage is associated with certain difficulties. To simplify this task, specialized experts recommend the following:
- When tying ribbons on a blanket, try to keep their ends as short as possible, so that the animal does not get caught or suffocate.
- In the first days of the rehabilitation period, you must constantly be with your pet, as he will try to remove the “cover”.
- If the wound is bleeding, place a sanitary pad under the bandage.
- When your cat wants to go to the toilet, do not completely remove the blanket. Just untie the last two ribbons.
That, in fact, is all you need to know about postoperative bandages. However, finally, it is worth noting that sterilization is a great emotional shock for the animal, so you must be very careful and patient with it. Only with proper care will your four-legged friend be able to recover quickly.
Towel blankets
What makes them special? If the method of making a bandage with children's things did not work out, for example, you simply did not have any or you have problems choosing the appropriate size, then you can make it from towels. Perhaps this blanket can be considered one of the best, since it combines ease of tailoring, efficiency and practicality.
To make a bandage for a cat, you will need a regular cotton towel, in which four holes are cut for the animal's paws. And also ribbons are sewn on the ends of the material, acting as ties that secure the blanket on the back of the four-legged friend.
Advantages of the technique:
- Everyone has towels;
- You don't need to have high sewing skills.
The disadvantages include the fact that the fabric does not have sufficient elasticity and density, so the bandages do not fit well to the body and often tear.
What to do if the animal has learned to get rid of the blanket on its own?
Many people are interested in what to do if a cat removes the bandage after sterilization. At the same time, a similar problem occurs not only with “covers” made from improvised materials, but also with blankets sewn with your own hands from elastic and durable fabric that have ribbons or Velcro. In this case, one of the following methods will help:
- limitation of physical mobility;
- installation of a surgical collar;
- sedatives.
Giving medications is not recommended without first consulting a veterinarian. It is better to put your pet in a basket or a regular cardboard box. This will limit the cat's mobility, and she will no longer be able to remove the blanket.
Sewing blankets at home
If you have tried all the methods described above, but they did not work for you, then in this case you can make a bandage for your cat with your own hands from scratch. Homemade blankets are in many ways superior to similar ones made from improvised means, however, this is not without its drawbacks.
The main difficulties are that sometimes it is very difficult to choose the right size, as a result of which the “case” has to be altered several times. There are still some problems with the choice of material. But if you do everything right, the bandage will turn out to be of high quality.
Determining the method of fixing the blanket
After the bandage is ready, you need to think about how you will attach it to the animal's body. As a rule, the two most commonly used options are ribbons and Velcro, but which one is better and more practical? It is difficult to give any specific recommendations, since everything here depends on the individual preferences of a particular person. So that you can decide on the method of fixing the blanket, let's look at the main pros and cons of each of them.
Advantages of ties:
- they can be made of any material;
- easy to sew;
- provide good fixation.
Disadvantages of ties:
- may cling to surrounding objects;
- A tightly tightened knot is difficult to untie.
Pros of Velcro:
- comfortable and practical;
- are small in size.
Disadvantages of Velcro:
- require additional cash costs;
- quickly get dirty, as a result of which they lose their quality;
- your pet can learn to unfasten them.
When deciding on the method of fixing the blanket, carefully weigh all the advantages and disadvantages of each of them, and choose the best option for yourself.