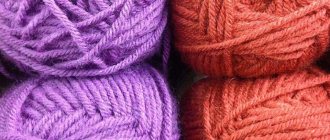
Not long ago, thick knitted yarn appeared on sale, from which rugs and baskets are crocheted. The choice is huge, both from Russian and foreign manufacturers. The color palette and composition are also pleasing: you can even find printed yarn, not only made of pure cotton, but also with the addition of acrylic. It seemed to me that such threads would be quite suitable for a cat bed. I like the very first one the least, it was more likely to test the capabilities of the yarn. It turned out to be a large bed, very comfortable for cat moms. I even had to make a mattress. The basket fits quite well into a child's box and is quite in demand, although the walls hold their shape rather poorly.
So I decided to knit a couple more. It’s not that we don’t have enough of this goodness, but, as it turns out, knitted beds are very convenient for the cold season. In sunny weather, cats love to soak up the sun, and our window sills are quite cold, and this decision turned out to be successful; all cats will definitely be comfortable on a frosty and windy day. I knitted again according to the basket principle. You can find enough master classes and descriptions on the Internet that even a beginner knitter can do it. The following yarn was purchased, three bobbins of each color - that’s how much was spent on each bed. Everything was crocheted with number 9 crochet.
The baskets have different shapes - I’m just not very interested in repeating the same thing all the time, so the bottom of the green one is knitted in a square; this does not affect the knitting of the sides. At the same time, first I made two rather tall baskets. The cats liked them, but I didn't like them. Firstly, they didn’t keep their shape well, and secondly, they didn’t look very neat.
In general, I twirled them a little in my hands and decided to slightly transform them:
When a pet appears in the house, and even one as cute as a cat, it becomes more comfortable and warm, cozy. Why does a furry pet need its own personal hole, since it has all the space in the apartment at its disposal? Fluffy feels comfortable on your pillow or in your bed, on an armchair or even in your closet. But this cannot replace a personal home for a pet.
And besides, a beautiful, homemade cat house knitted, crocheted or made from any other materials will be an effective addition to the interior, giving it special charm and harmony.
Maybe buy a cat house? Online stores and specialized boutiques offer a wide range of cozy, comfortable homes for pets. But making a cat house with your own hands has its advantages.
Firstly, it is economical. To knit an aesthetic product, you will need yarn, knitting needles or a hook, a pattern and a little imagination. Secondly, it will fully match the size of your pet and will fit beautifully into the interior of the room.
Crochet pattern
A cat house is crocheted quite quickly and easily if you are at least a little familiar with this technique. Let's start from the bottom. To perform it, we use hook No. 8. Cast on 3 air loops (hereinafter ch), close the chain into a ring using 1 connecting post (hereinafter ss). The rows will begin with one ch rise and end with a ss.
- 8 single crochets (hereinafter sc), close in a circle;
- increase x8 (16);
- (sc, inc) x8 (24);
- (2sc, inc) x8 (32);
- 32 single crochets;
- (2 sc, inc) x8 (42);
- 42 single crochets;
- (2 sc, inc) follow the sequence until the end of the tier (56);
- 56 single crochets;
- (2sc, inc) we follow the sequence until the end of the tier;
- single crochet in each loop of the previous tier;
- (4 sc, inc) repeats until the end of the tier;
- 13-16. single crochet in each loop of the previous tier;
- (5 sc, inc) and so on until the end of the row;
- single crochet in each loop of the previous tier.
Now you need to make a kind of entrance to the home. To do this, you need to knit half a row of sc in each loop, cut the thread, leave the end (this is the 19th row). Then we perform one sc in each loop, when only 5 remain, we tie in the tail remaining from the previous row and break the thread.
Next, 10 single crochets - skip, we start knitting from the place where the previous row began, we knit the remaining ends of the threads into the main fabric to give the product an aesthetic appearance (20 row). We repeat the 20th row five more times (21-25 rows). The entrance to the house is knitted in 7 circles.
When doing the work, you need to make sure that the lines are perfectly even and neat; you should start and finish knitting in the same column. Next, we carry out the work according to the scheme:
- 26th row we knit sc in each loop (hereinafter kp.) of the previous row, we close the row after knitting 8 loops above the entrance;
- 27-30. sc in k, repeat until the circle is completed;
- (4 sc, dec) repeat until the end of the tier;
- 32-33. sc in k, repeat until the end of the row;
- (3 sc, dec) repeat until the end of the tier;
- sc in kp, repeat until the end of the tier;
- 36-37. (3 sc, dec) repeat until the end of the tier;
- 38-39. (2 sc, dec) repeat until the circle is completed;
- 40-41. (sc, dec) and so on until the end of the tier.
The ring should close. If this does not happen, we continue to knit tiers with decreases. We carefully hide the remaining ends of the thread in the fabric so that they do not stick out and spoil the appearance of the product.
If you have experience and skills in this technique, you can additionally knit cat ears or perform any other decorative elements. Here, in fact, the personal space for the pet is ready. You can lay something soft inside and put the house into operation.
You need to crochet a cat house strictly according to the pattern. Any mistake, even one missed loop or stitch, can have a bad effect on the aesthetic characteristics of the product. Such housing for a pet is not only beautiful, but also cozy. There the fluffy will feel protected and comfortable.
A homemade cat house will harmoniously complement the interior if you choose the right yarn color and also use a creative approach to its design.
Cats love hiding places, but finding them in an apartment is difficult. Cat houses help create comfortable conditions for your pet. They are sold in pet stores and pet supply departments. But if none of the ready-made options suits you, you can make a knitted cat house with your own hands. The pet will feel comfortable in it, and the owner will be able to enjoy communication with a happy and calm animal.
We knit a cat bed mat
If you have pets in your home, then you should be well aware that they, like you and me, love different gifts very much! 
I suggest you please your pets and knit such a cute crocheted rug for them.
Our rug will consist of separately knitted and stitched squares, made with a beautiful relief pattern. Thanks to the relief, the mat has a light massage effect, which your pet will especially like!
If you are knitting a product for a cat, then for a rug size of 54 cm x 40 cm you will need about 300 grams of any yarn (80 m/50 g). You will need to knit 12 squares.
If you are planning to knit such a rug for a dog, then for a rug size of 108 cm x 80 cm you will need to knit 24 of the same squares and, accordingly, double the yarn consumption.
Attention! To make the rug denser, we will knit it in two threads!
To work, we will also need a No. 5 hook, a sewing needle and knitting markers.
To knit such a rug you need to have certain skills
In particular, you must be able to:
Sliding loop ( SP )
Air loop ( VP )
Connecting post ( CC )
Single crochet ( sc )
Double crochet ( dc )
When knitting, we will perform one more element - a convex relief stitch ( VRS ) - it is performed like a single crochet stitch, but we insert the hook not into the loop of the column of the bottom row (as usual), but under the column of the bottom row itself, and from the outer, near sides towards you, and when knitting the loops, twist the thread a little around the axis.
Let's start knitting.
1st row:
We perform a sliding loop ( SP ).
And 3 air loops (hereinafter VP) for lifting. For convenience, mark the third lifting loop with a marker.
Now we knit around the ring, grabbing the tip of the thread, 11 double crochets (hereinafter referred to as dc ).
When all 11 stitches are knitted, tighten the sliding loop by pulling the end of the thread.
We insert the hook into the third lifting loop, marked with a marker, and perform a connecting post (hereinafter SS ).
Perform 3 ch for lifting (if desired, mark the third loop with a marker).
2nd row:
1СН, 2ВП.
We make 1 convex relief column (hereinafter referred to as VRS ) - to do this, insert a hook under the column of the bottom row on the side closest to you.
When knitting a loop, twist the thread a little around the axis.
We perform 2VP.
Next, we perform 2СН and 2ВП again.
And again we perform 1VRS, 2VP.
We continue to alternate 2СН+2ВП and 1ВРС+2ВП until the end of the 2nd row. We perform SS and 3VP lifts.
During the knitting process we got 4VRS. If desired, mark them with markers for reference.
3rd row:
3СН, 2ВП.
1VRS, 2VP.
Next, 6СН, 2ВП.
And again we perform 1VRS, 2VP.
So we continue to alternate 6СН+2ВП and 1ВРС+2ВП until the last 2 loops of the row.
We perform 2 dcs.
Next SS and 3VP lifting.
4th row:
5СН, 2ВП.
1VRS, 2VP.
10 SSN, 2VP, 1VRS, 2VP.
We continue to knit until the end of the row, alternating 10СН+2ВП and 1ВРС+2ВП until the last 4 loops of the row.
We perform 4СН.
Next we perform SS and 1VP lifting.
5th row:
We perform the entire row of sc in each knitting loop. And now our first square is ready.
For the rug we must knit 12 of these squares.
Now we must connect our squares to each other.
To connect, you can choose any method convenient for you, for example, crocheting the back walls of the loops along the front side of the squares.
In this case, our connection will look like this:
Or capturing both walls of the loop. In this case, the seam will be more convex and embossed.
You can make a crochet connection from the wrong side, and then on the front side our seam will look like this:
We will connect the squares using a needle. We will sew the squares from the front side to the back walls of the loops.
Such a connecting seam will look like this in the product:
We connect all 12 squares in this way.
We attach the working thread and tie our product next to the sc in each loop.
Important! Increase in the corners of the product and knit an additional sc.
Then, tie our product in a circle with an RLS again, performing 1VP after each RLS.
We thread all the threads from the wrong side of the product.
And now our rug is ready!
Your pet purr will definitely appreciate your work and will be very grateful to you!
I hope that the master class will be interesting to you!
Happy creativity!
Which yarn to choose: pros and cons of each type
For a cat to like its new home, it must be comfortable for the pet. Much depends on the material. You need to choose yarn based on the needs of the animal, not the owner.
Wool
Wool is a good option for a winter home. It retains heat well and does not allow moisture to pass through. The woolen house will not lose its shape after several washes, and cat claws will not ruin it immediately.
Among the disadvantages: pellets may form on the product, and if the yarn is of low quality, then the cat’s home will turn out to be prickly. The first problem can be solved by careful care and dry cleaning, the second by choosing high-quality material. There are allergies to wool - not only in people, but also in cats; this fact cannot always be identified in advance.
Acrylic
Acrylic is cheaper than wool, and there are practically no allergies to it in either people or cats. It is durable, the resulting products are easy to care for, and a variety of colors will help make the cat’s house a stylish piece of art.
But there are disadvantages - acrylic does not allow air and moisture to pass through well. If the acrylic house is not washed often enough, the cat's hair may begin to fall out. To solve this problem, you need to use additional bedding inside the product. Another trouble is static. It is unlikely that a cat will want to climb into a house where discharges crackle from every movement. The animal may find the smell of antistatic agent too strong.
Viscose
Viscose allows moisture to pass through well, does not electrify, is available in a variety of colors, and retains heat. She is very soft. But this type of yarn is not without its drawbacks - viscose is demanding to care for, and if washed incorrectly, it quickly loses its appearance and shape.
To combine the advantages and compensate for the disadvantages of each type, combined threads are used - wool/viscose or acrylic/viscose.
Which knitting method is suitable
The most convenient way to crochet a house is to get the desired shape easier. But if the housewife likes to knit, this is also doable.
Short Crochet
The main technique that is suitable for a cat house is short crochet. The loops and posts are successively strung on top of each other, gradually creating the product. It takes patience and perseverance, but the results are worth it.
Tunisian knitting
Tunisian knitting is suitable if you need to make a large house for a Maine Coon or a cat that likes to stretch out its paws in its sleep. A long hook is used, on which loops are cast on, like on a knitting needle.
Circular knitting
Circular knitting is suitable for quickly making beds with low sides. The fabric is supported by four knitting needles, the fifth is used as a working knitting needle. The method is not suitable for complex structures.
Instructions for crocheting a cave house
In order to make a cat house, you will need:
- two hooks (No. 8 and 10);
- tapestry needle;
- stitch markers (you can work without them, but it’s inconvenient).
Dimensions of the finished product: diameter of the bottom and roof - 38 cm, height of the walls - 18 cm. It will require 400g of acrylic/viscose. The main method of knitting is double crochet and single crochet.
LiveInternetLiveInternet
This post describes how to knit a sofa for your dog or cat yourself. You can knit such a magnificent bed with pillows. There is a detailed description of knitting a sofa.
from here
Sofa for a dog Difficulty: medium Finished size: 10″ (25 cm) in height and 16″ (40 cm) in length Needed: - yarn of medium thickness: - 18 oz/510 g pink; — 2 oz/57 g lilac, blue and green; — 1 oz/28 g cream color; — hook G/4/6 mm; - a safety pin or something else for marking; - tapestry needle; — foam rubber 27″ (67.5 cm) x 55″ (137.5 cm) thickness 1″ (2.5 cm); - padding polyester. Density: - 4 tbsp = 1″ (2.5 cm); — 2 rows of st s/n 1″ (2.5 cm) Special. loops: V-loop: (st s/n, 2 air, st s/n) in the indicated loop. Initial V-loop: (5 chains, dc) in the indicated loop or space. Description Bed Bottom Note: do not join rows unless otherwise instructed. Mark the beginning of the row with a safety pin. 1 circle: with a pink thread, 2 chains, (st b/n, half st, 10 st s/n) - in the second loop from the hook (12 loops). 2nd and 3rd circles: 2 treble stitches in each loop to the end (at the end of the 3rd round, 48 treble stitches). 4th circle: [on st s/n next. 2 st s/n, 2 st s/n in the next st s/n] - to the end (64 st s/n). 5 round: [on st s/n next. 4 tbsp s/n, 2 tbsp s/n in the next st. s/n] - 6 times, along the st s/n in the last 34 st. s/n (70 st. s/n). 6th circle: across the st s/n in the first 4 st s/n, [according to the next st s/n. 5 tbsp s/n, 2 tbsp s/n next. st s/n] - to the end (81 st s/n). 7th circle: across the st s/n in the first 2 st s/n, 2 st s/n in the next. st s/n, [according to st s/n next. 6 tbsp s/n, 2 tbsp s/n next. st s/n] - to last. loops, st s/n in last. loop (93 st s/n). 8th circle: [on st s/n in the next. 7 tbsp s/n, 2 tbsp s/n next. st s/n] - to last. 5 loops, st s/n in the last. 5 loops (104 sts/n). 9th circle: across the st s/n in the first 5 st s/n, [according to the next st s/n. 8 st s/n, 2 st he next. st s/n] - to the end (115 st s/n). 10th circle: [on st s/n in the next. 9 st s/n, 2 st s/n next. st s/n] - to last. 5 loops, st s/n in the last. 5 loops (126 sts/n). 11th circle: [on st s/n next. 9 st s/n, 2 st s/n next. st s/n] - to last. 6 loops, st s/n last. 6 loops (138 sts/n). 12 round: [on st s/n next. 9 st s/n, 2 st s/n next. st s/n] - to last. 8 loops, st s/n in the last row. 8 loops (151 st s/n). 13th round: across the st s/n in the first 4 st s/n, 2 st s/n in the next. st s/n, [according to st s/n next. 10 st s/n, 2 st s/n next. st s/n] - to last. 3 loops, st s/n in the last row. 3 loops (165 st s/n). 14th circle: [on st s/n next. 10 st s/n, 2 st s/n next. st s/n] - to the end (180 st s/n). 15th circle: [on st s/n next. 11 st s/n, 2 st s/n next. st s/n] - to the end (195 st s/n). Round 16: st s/n in the first 3 st s/n, half st s/n in the next. 3 tbsp s/n, along st b/n next. 3 tbsp s/n, according to the connection. loop in the next 3 tbsp, leave the remaining stitches unknitted. Do not break the thread. Sides 1 round: knit behind the back arcs of the loops (see figure) only the remaining loops of circle 15 and circle 16, 3 air. (count as the first st s/n here and further), st s/n in each loop to the end, connect using the connector. loops from the top air. initial 3-tail (195 st. s/n). 2 - 6 circles: 3 chain stitches, s/n in each loop to the end, connect using connector. loops from the top air. initial 3 air. At the end of the 6th round, finish knitting.
Top 1 - 16 circles: repeat bottom circles 1 - 16.
Shuttlecock 1 round: knit behind the front arcs of the loops (see figure) only the remaining loops of circle 15 and circle 16, conn. loop in the trail loop, initial V-loop in the same loop, 2 air., [V-loop in the next. loop, 2 air., skip next. loop] - to the end, connect using conn. loops with 3rd air. initial 5 air (98 V-loops). 2 - 6 circles: (connecting loop, initial V-loop) - in the first V space, 2 air., [V-loop in the next. V space, 2 air] - to the end, connect using connector. loops with 3rd air. initial 5 air. At the end of the 6th round, finish knitting. Joining the Sides and Top Cut 3 circles of foam, each 15″ (37.5 cm) in diameter. Using a tapestry needle and pink yarn, sew the top loops of the last circle of the sides with the loops of the last circle of the top, inserting foam rubber. Headboard row 1: start from the bottom with pink thread, 101 air. (initial chain), 3 more air. (rotary chain), st s/n in the 4th loop from the hook, st s/n in each loop of the chain to the end, turn (102 st s/n, initial 3 chains count as the first st s/n) . 2nd row: 3 air. (count as the first st s/n here and further), st s/n in each loop to the end, turn / 3 - 4 rows: skip the first loop, connect. loop in the trail loop, st b/n in next. loop, half st. s/n in next. loop, st s/n in each loop until the last one. 4 loops, half s/n in the next stitch. loop, st b/n in next. loop, conn. loop in the last 2 loops, turn (100 loops at the end of the 4th row). 5th row: skip the first loop, according to the connection. loop in the next 4 loops, sc b/n next. loop, half st. s/n in next. loop, st s/n in each loop until the last one. 7 loops, half s/n in next. loop, st b/n in next. loop, conn. loop in the last 2 loops leaving last. 3 loops not knitted, turn (96 loops). Row 6: skip the first loop, following the connecting loop to the next. 2 loops, st b/n in next. loop, half st. s/n in next. loop, st s/n in each loop until the last one. 7 loops, half s/n in next. loop, st b/n in next. loop, conn. loop in the last 2 loops leaving last. 3 loops not knitted, turn (92 loops). 7th row: skip the first loop, following the connecting loop in the next. 6 loops, st b/n in the next. loop, half st. s/n in next. loop, st s/n in each loop until the last one. 10 loops, half s/n in next. loop, st b/n in next. loop, conn. loop in the last 2 loops leaving last. 6 loops not knitted, turn (85 loops). 8th row: skip the first loop, according to the connection. loop in the next 7 loops, st b/n in the next. loop, half st. s/n in next. loop, st s/n in each loop until the last one. 16 loops, half s/n in next. loop, st b/n in next. loop, conn. loop in the last 2 loops leaving last. 12 loops not knitted, turn (72 loops). Rows 9 and 10: skip the first loop, following the connecting loop to the next. 4 loops, st b/n in the next loop, half st b/n in the next one. loop, st s/n in each loop until the last one. 9 loops, half s/n in next. loop, st b/n in next. loop, conn. loop in the last 2 loops leaving last. 5 loops not knitted, turn (60 loops at the end of the 10th row). 11th row: skip the first loop, according to the connection. loop in the next 2 loops, st b/n in next. loop, half st. s/n in next. loop, st s/n in each loop until the last one. 9 loops, half s/n in next. loop, st b/n in next. loop, conn. loop in the last 2 loops leaving last. 5 loops not knitted, turn (54 loops). Row 12: skip the first loop, following the connection. loop in the next 3 loops, st b/n in the next. loop, half st. s/n in next. loop, st s/n in each loop until the last one. 6 loops, half s/n in next. loop, st b/n in next. loop, conn. loop in the last 2 loops leaving last. 2 loops not knitted, turn (51 loops). Row 13: skip the first loop, following the connection. loop in the next 5 loops, sc in next. loop, half st. s/n in next. loop, st s/n in each loop until the last one. 7 loops, half s/n in next. loop, st b/n in next. loop, conn. loop in the last 2 loops leaving last. 3 loops not knitted, turn (47 loops). Rear 1st row: start from the bottom, 113 air. (initial chain), 3 more air. (rotary chain), st s/n in the 4th loop from the hook, st s/n in each loop of the chain to the end, turn (114 st s/n, initial 3 chains count as the first st s/n) . Rows 2 - 13: repeat rows 2 - 13 for front. Finish knitting. Use the knitted part of the front as a pattern, cut it out of foam rubber. Add up the details of the faces. sides and sew as in fig. Unscrew the parts and insert foam rubber. When shaping the headboard, sew the bottom of the headboard to the 2nd last. circles at the top of the bed. Pillow Front (knit 3). Note: colors for pillows 2 and 3 are given in brackets; if only 1 color is indicated, then it is for all 3 pillows. 1 circle: pink thread, 1 air. (central air), 3 more air, 11 st s/n in the central air, connect using connector. loop with top air. initial 3 air. (12 st s/n, initial 3 sts count as the first st s/n). Finish knitting. 2nd circle: attach a green (lilac, blue) thread using the connector. loops in connection loop, 3 air. (count as the first st s/n here and further), (st s/n, convex st s/n (see figure), 2 st s/n) - in the same st s/n, along st s/n n next 2 st s/n, *(2 st s/n, convex st s/n, 2 st s/n) - next. st s/n, by st s/n next. 2 tbsp s/n, repeat from * to the end, connect using conn. loops from the top air. initial 3 air. Finish knitting. (24 treble treble, 4 raised treble treble). 3rd circle: attach a thread of blue (green, lilac) color using the connector. loops in connection loop, 3 air, st s/n in the same st s/n, 2 st s/n in the next. st s/n, *convex st s/n around convex st s/n, 2 st s/n in the next. 2 st s/n, along the convex st s/n around the next. 2 tbsp s/n**, 2 tbsp s/n next. 2 tbsp s/n. repeat from * to the end, end with the last. repeat on **, connect using conn. loops from the top air. initial 3 air. Finish knitting. (44 loops). 4 circle: attach a thread of lilac (blue, green) color using the connector. loops in connection loop, st s/n in the same st s/n, 2 st s/n in the next. 2 st s/n, * st s/n next. St s/n, convex st s/n around convex st s/n, st s/n in the next. st s/n, 2 st s/n next. 3 st s/n, along the convex st s/n around the next. 2 convex sts s/n**, 2 sts s/n next. 3 st s/n, repeat from * to the end, end with the last one. repeat on **, connect using conn. loops from the top air. initial 3 air. Finish knitting. (68 loops). Back Knit one of each color blue, green, lilac. 1st round: repeat the 1st front round, do not break the thread. 2nd circle: 3 air, st s/n in connection. loop, 2 st s/n in next. st s/n, 3 st s/n next. st s/n, [2 st s/n next. 2 tbsp s/n, 3 tbsp s/n next. st s/n] - to the end, connect using conn. loops from the top air. initial 3 air. (28 loops). 3rd circle: 3 air, 2 st s/n in the next. st s/n, [st s/n in the next st s/n, 2 st s/n next. st s/n] - to the end, connect using conn. loops from the top air. initial 3 air. (42 loops). 4 circle: 3 air, 2 treble s/n in the next. st s/n, *[st s/n next. st s/n, 2 st s/n next. st s/n] - 3 times, 2 st s/n next. 2 tbsp s/n, repeat from * to the end, connect using conn. loops from the top air. initial 3 air. Finish knitting (68 stitches). Connecting the front and back Connect the front and back with the wrong sides, knit through both thicknesses, attach a cream-colored thread using the connector. loops with any st s/n, 2 air., V-loop in the next. loop, [half stitch s/n in next. 2 loops, V-loop in next. loop] - to the end, fill with padding polyester, connect using the connection. loops from the top air. initial 2 air. Finish knitting. Sew pillows to the headboard as in the photo.
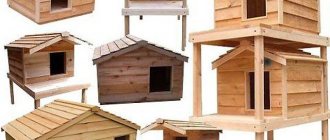
Types of knitted houses with photos
There are many types of pet housing. The main distinguishing parameter is the shape of the house. The photo shows the most common options:
- Round knitted house (nest);
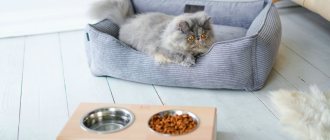
- House-bed;
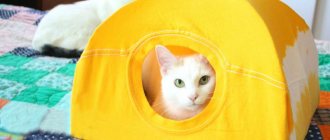
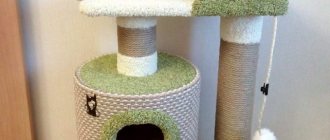
- Pipe house;
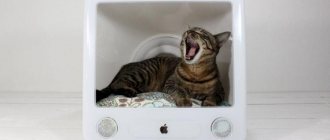
- Soft Cave House;
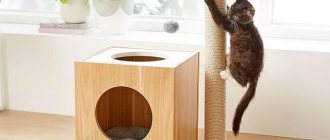
- Bed with low sides.
Video: Instructions for crocheting a basket for a cat
A cat house is a useful thing that makes it possible to make your pet’s living environment as comfortable as possible. If you have time, materials and imagination, then it will be easy to incorporate cat’s joys into the interior of the room.
How to knit a cat house
The most popular option for knitted houses for pets is an igloo (a form of Eskimo housing). If you complete all the steps correctly, you will get a fairly compact, comfortable, aesthetic product that will not only become a cozy home for your pet, but will also harmoniously complement the interior.
Below are instructions on how to connect a house with the following parameters:
- round shape with a hole on the side wall, which serves as an entrance;
- bottom diameter - 37 cm;
- the height of the structure is 20 cm.
For production you will need high-quality, durable yarn. It's best to buy a ball at the store, but you can use thread that was left over from an old sweater or some other unnecessary thing. Tools you need to stock up on include stitch markers, tapestry thread and hooks.